Turbo 360: More potential shell ruining lol

For drift/rally/builds cars projects, engine conversions etc...
Describe your plans, project(s) evolution, works progress and final result!
volvosneverdie
*** V3M DONOR ***
Posts: 9143
Joined: 11 Nov 2008 04:22 pm
Location: Newcastle Upon Toon

Re: Turbo 360 update 28/10

Post by volvosneverdie » 07 Nov 2010 09:25 pm

L14MNP wrote:If it's any consolation they were just there for show since I converted to injection. I am the Lexus RH400 of the Volvo world etc.
Lexi.
The japanese mercedes.
Jet!

youve got minor womens whiplash Lynne.
etc.
Image

Ride_on
Posts: 2265
Joined: 26 May 2009 05:34 pm
Location: Belfast, N. Ireland

Re: Turbo 360 update 28/10

Post by Ride_on » 09 Nov 2010 06:37 pm

I was just thinking about the intercooler and noticed something different about your 96 donor against mine, that the intercoolers are different. Your one looks the same as my 95 car, but maybe its because its an FK. My 96 B230FT has the intercooler pipe comming out halfway up the radiator just about in the right place for the 360 inlet holes in the front panel. The air pipes are much better in the later car, the 95 one is a pain to change the air filter because of it. I havn't done all the measurements yet, but it looks like it might be worth trying to fit it, worse case modify it.

Anyway has anyone tried to fit a 96 940 intercooler to a 360?
1980 345 DL_______1987 360 GLE (project car restored to GLT spec and B230FT'd)
1984 360 GLT______1987 360 GLT
1983 360 GLS______1989 360 GLE
1985 340 GL_______1986 340 1.4
1985 360 GLS______1995 940 SE 2.3 Turbo Estate (daily)
1987 340 GL 1.7

User avatar
SteveP
*** V3M DONOR ***
Posts: 7943
Joined: 21 Sep 2004 12:45 pm
Location: Coventry, UK

Re: Turbo 360 update 28/10

Post by SteveP » 11 Nov 2010 12:02 am

I think the differences in intercoolers on the 900's is down to whether the car has aircon or not... the intercoolers with the inlet/outlets half way up are fitted to cars with air con and the intercoolers with them at the top are without aircon. A few people have used Vauxhall Frontera TDI intercoolers, which fit very nicely.
1989 - Volvo 360 GLT
1985 - Volvo 360 GLS
2008 - Volvo S60 SE Lux

User avatar
filthyjohn
*** V3M DONOR ***
Posts: 2693
Joined: 12 Sep 2006 09:07 pm
Location: Sunderland, Ringpiece Of England

Re: Turbo 360 update 28/10

Post by filthyjohn » 11 Nov 2010 10:47 am

Ride_on wrote:Anyway has anyone tried to fit a 96 940 intercooler to a 360?
You'd need to chop a slot into the front valance and sink the cooler down about 3". The wide part at the top with the inlet/outlet is too wide to fit between the headlights too. Nissan Juke intercoolers look a good bet, but there aren't many of those in scrappies yet. :lol:
'87 Nissan Sunny
'95 945 LPT
'90 340 3dr
'87 360 GLT
'87 765 TIC
'75 Manta A
'70 Rover P5 V8
'67 MGB GT
'62 amazon 2dr

User avatar
L14MNP
Posts: 1340
Joined: 26 May 2010 09:15 pm
Location: Sunderland/Durham

Re: Turbo 360 update 28/10

Post by L14MNP » 11 Nov 2010 12:35 pm

Yeah, the 940 intercooler is way too tall and wide for a 300. Plus plastic end tanks, so not really woth chopping the front panel and crossmember up for IMO. An alloy ftermarket FMIC made much more sense to me.


I have read numerous times that the only differences between FK and FT cars are the actuator, stronger spring on an HPT, and the airbox, which has turbo written on it and extra intake holes.

I'm not familiar with any difference in IC's, what Steve is saying makes sense though.

Here's a few pics showing the 940 IC and boost pipes fitted to the 360. I don't remember how many were posted in this thread, but they should help.
Image
Image
Image
Image
Image
Image
Image

I had no intention of running the car with it, it was just fitted for testing purposes. Like John says, you can see, there's many things in the way of it fitting. If you don't want headlamps then you could get past the width issue lol, but the height is always going to be a problem.

and a Renault Trafic one, just for good measure lol.
Image#
This effectively fit in the space once I had trimmed off the OE brackets, but the outlets were in the wrong place for where I wanted my boost pipes.

Speaking of boost pipes, I have routed them through the original CAI holes in the front panel that you refer to. I suppose it depends where you're planning to fit your FMIC, lower down or in the vast empty wasteland between the headlamps?

Mine is there for numerous reasons, but very highly up the list was that it gave my 'grille' something to frame. It's no secret I depsise the front end on these when mostly standard. lol
STREETO WITHDRAWL
INTO BURNOUTSsince1982

Ride_on
Posts: 2265
Joined: 26 May 2009 05:34 pm
Location: Belfast, N. Ireland

Re: Turbo 360 - 940 FMIC pics for ride_on 11/11

Post by Ride_on » 11 Nov 2010 01:43 pm

Thanks for that, I think Steve is right, my donor does have AC. And I don't want to weaken the front valence area by cutting a hole in it but the AC compatible intercooler looks to be a little smaller than the non-AC/top entry type. Its tight but worth checking, I'll double check it once I get the rusted screws drilled out.
1980 345 DL_______1987 360 GLE (project car restored to GLT spec and B230FT'd)
1984 360 GLT______1987 360 GLT
1983 360 GLS______1989 360 GLE
1985 340 GL_______1986 340 1.4
1985 360 GLS______1995 940 SE 2.3 Turbo Estate (daily)
1987 340 GL 1.7

User avatar
L14MNP
Posts: 1340
Joined: 26 May 2010 09:15 pm
Location: Sunderland/Durham

Re: Turbo 360 - 940 FMIC pics for ride_on 11/11

Post by L14MNP » 11 Nov 2010 03:33 pm

Sounds promising mate. Having the outlets positioned lower down may just squeeze it in width ways, but unless it's a different height then you're probably going to have to look at using another one.

Here's a couple of pics showing the dimensions of the 940 FMIC. Maybe it will save you pulling one of your cars apart for sizes? lol
STREETO WITHDRAWL
INTO BURNOUTSsince1982

Ride_on
Posts: 2265
Joined: 26 May 2009 05:34 pm
Location: Belfast, N. Ireland

Re: Turbo 360 - 940 FMIC pics for ride_on 11/11

Post by Ride_on » 12 Nov 2010 02:33 pm

It is lower in height than the non-AC version, it actually fits under the front brace thingy, width wise looks just about ok. There are some metal plates above but they can easily cut-off.
Attachments
IMG_2638.JPG
Non AC FMIC
IMG_2637.JPG
AC FMIC
1980 345 DL_______1987 360 GLE (project car restored to GLT spec and B230FT'd)
1984 360 GLT______1987 360 GLT
1983 360 GLS______1989 360 GLE
1985 340 GL_______1986 340 1.4
1985 360 GLS______1995 940 SE 2.3 Turbo Estate (daily)
1987 340 GL 1.7

User avatar
Fuse
Posts: 1364
Joined: 29 Jul 2004 09:03 pm
Location: Finland
Contact:

Re: Turbo 360 - 940 FMIC pics for ride_on 11/11

Post by Fuse » 12 Nov 2010 03:59 pm

Some people in Sweden have fitted these tall OEM ICs by doing a bit of a hack job install and cutting the front valance and fitting the IC upside down.

Image

But I wouldn't do this because 80's stock OEM ICs arent very effective and nowadays there are these quite cheap chinese full aluminium bar and plate coolers available in many core sizes and with different end tank designs. Plenty of these are for sale in Ebay for example.

SJS is running a mid size chinese core from KL-racing in his 340

Image
Image

I have a "chinabay" cooler also in my car

Image
Image
Image

For example prices at KL-Racing start from around ~75 euros with the smallest cores so bang for buck ratio is quite unbeatable with these.
Volvo R-Sport - Equipment for the car enthusiast.

“Buy land, they're not making it anymore” - Mark Twain


"There are only three sports: bullfighting, motor racing, and mountaineering; all the rest are merely games." -Ernest Hemingway

User avatar
L14MNP
Posts: 1340
Joined: 26 May 2010 09:15 pm
Location: Sunderland/Durham

Re: Turbo 360 - 940 FMIC pics for ride_on 11/11

Post by L14MNP » 12 Nov 2010 07:13 pm

I was gonna say upside down may be a way, but as I said above I don't consider them worthy of hacking the front panel for the reasons Fuse states.

I too run an eBay core and it is ideal. If you are happy with the OEM cooler and don't ever want much more than stock HPT boost then I guess it would be a goer though. Each to their own.
STREETO WITHDRAWL
INTO BURNOUTSsince1982

User avatar
L14MNP
Posts: 1340
Joined: 26 May 2010 09:15 pm
Location: Sunderland/Durham

Re: Turbo 360 - 940 FMIC pics for ride_on 11/11

Post by L14MNP » 14 Nov 2010 11:31 pm

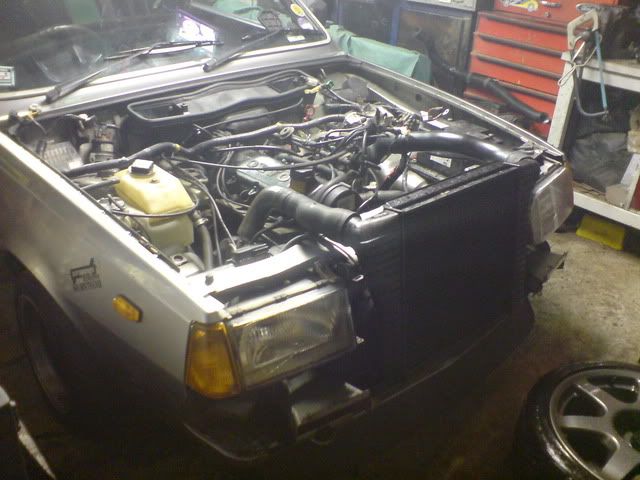
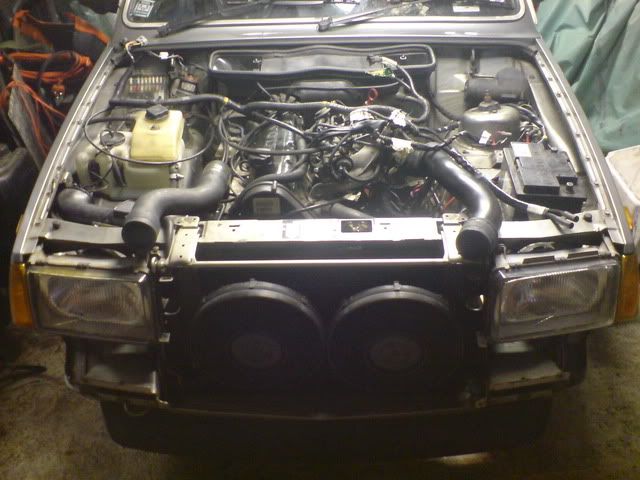
Project mini-winter-resto continues. I spent a bit of time on the car down the garage this evening and this is where I am currently at.

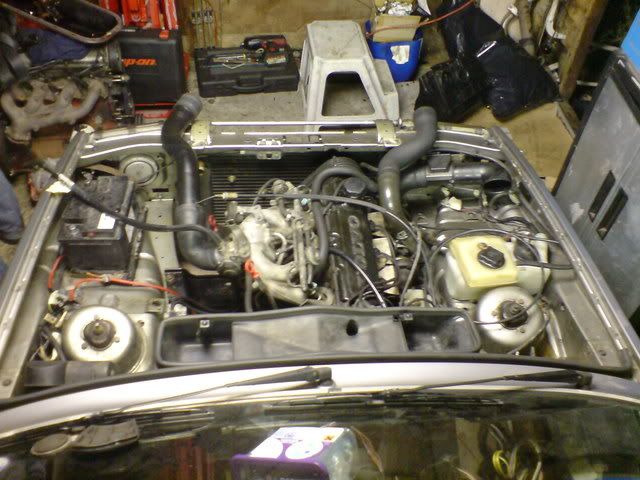
At present I have a wire free bay. Which I like. I don't plan a wire tuck on this car, just what I like to think of as de-cluttering the bay, moving random earths/lives etc and combining the 360 and 940 looms where possible.
Image
Image

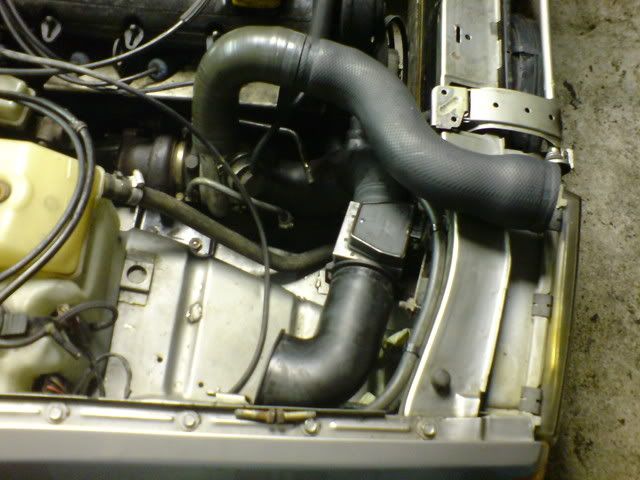
Right, now that I have removed what I don't want from the 360's engine bay - fuse box loom. I am going to reroute it so less is on show.

Something like the pics below. This is the first time I have layed it in the engine bay since chopping it about, so a few sections are too long atm. Nothing taxing though.
Image
Along the leg, or much more likely, as in the pic below.
Image
Headlight/sidelight/side repeater/horn and reloacted earth need to be extended. Will be pinned to inner wing.
Image
Image
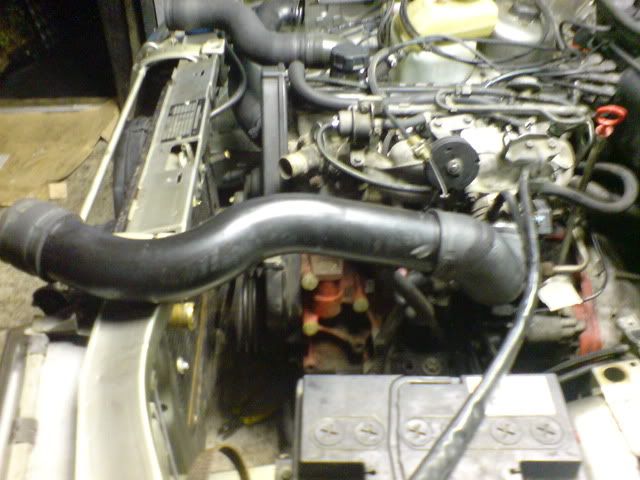
12v +ve moved from battery to starter. Will obviously be shortened. Routed under heater box (clearly not fitted) and servo etc.


I have been working on the B230 looms also as there were things I wanted to move a couple of unused connections remaining, alternator charging circuit, bonnet pin and some other unused/unrequired stuff. The largest of these looms is now looking a lot better, it's amazing what just taking all of the plastic conduit off can do. As you may expect, these do need to be shortened due to them coming from the donor barge.

I also blanked off the carbon cannister connections at the throttle body with a couple of cut down bolts. I was running about 2 feet of looped hose, so that's more unrequired crap out of the way.

B19 bracketry
Image
Depending on how easy they are to remove without spot weld drilling holes into the inner wings everywhere I may remove the old B19 airbox brackets and relocate the battery to the boot. Tidies things up and will give better weight distribution (every little helps!) I don't know at this stage though, as it may leave the bay looking unbalanced and then me relocating washer bottle and header tanks etc into the arches lol. CBA with that anymore.


And the worst part on the car
Image
z0mg h0al!

This is a strange one, baring in mind that prior to the two years I have owned the car it had sat in some dead old mans garage for 15 years then the lovely bodge (see below) had held up well.
Image
Yeah! Cake that filler on!

When I first got the car it looked like an innocent lump of chemical metal with no evidence of a hole beneath, it gradually fell off though. I don't think the hole has grown. lol


I don't mind. It' s nearly 27 years old, so is bound to have a few surprises for me.

Rgarding the fuse box, I think this will be going the journey in favour of a mini blade affair, and possibly reloacted to the other side of the bulkhead. It all depends how I feel when I get around to it.


/End transmission...
STREETO WITHDRAWL
INTO BURNOUTSsince1982

volvosneverdie
*** V3M DONOR ***
Posts: 9143
Joined: 11 Nov 2008 04:22 pm
Location: Newcastle Upon Toon

Re: Turbo 360 - wiring loom(s) modification

Post by volvosneverdie » 14 Nov 2010 11:50 pm

A hole?
In a mk2?

Sir, this is an outrage!
:)

Good wire figuring man. Relocating/changing a fusebox is frankly akin to Harry Potter magicness to me so i'll watch on, stroke my chin and bark encouragment.

Good work there!
Carry on.
Image

User avatar
L14MNP
Posts: 1340
Joined: 26 May 2010 09:15 pm
Location: Sunderland/Durham

Re: Turbo 360 - wiring loom(s) modification

Post by L14MNP » 19 Nov 2010 01:50 pm

Psh! I have bigger holes in some of my socks lol. You know the pair you intend to throw away but usually work their way back into the drawer a couple of times first? Or is that just me? :lol:

I have decided I am not going to replace the fuse box with a moder aftermarket unit. I removed the OE unit the other night, and TBH it is a very good design. Fully sealed too, plus the bulkhead is recessed for it so it would just bring more unjustified work.
Image
As you can see, it is minty fresh behind there, which was surprising, also now my rust hole is visible in it's full glory lol. The rest is just dirt. The top hole was made for the AFM etc B230 loom that connects to the B230 interior loom on the other side of the bulkhead. I would have prefered to bring it through the bulkhead in a less obvious place, but as it was built in 2 weeks it wasn't a major concern then.

I pulled another engine bay loom from one of FJ breakers the other day. Thanks again mate.

I done some mincing in the garage last night and stripped the donor loom of the sections I need to be able to extend my cars engine bay loom due to relocating it.

Image
One donor GLT birds nest
Image
Extentions for N/S & O/S headlight/sidelight/side repeater, washer pump, brake fluid level, horn, a couple of heavy earths. You get the picture.


I also attacked the B230 interior loom a bit more last night, removing some of the unrequired leftovers that I didn't want to touch once we had it running again after a little confusion (covered earlier in trhead) on the day of removal from the 940 lol.

Image
OEM glass break sensor and 3 unused plugs. I forget their use but I had them marked up as unused (for my application) and they weren't connected to anything else major, so they went the journey.
I'm 95.1275893734% certain that it should still function when reconnected to the other looms. lol After that, when in a running car once more I will see if I can sack off the alarm control box and what not.

The interior loom now. Looking that little more simplified. Every little helps and all that.
Image

and lastly
Image
No more rent in the window until next summer, so once this wiring crap is done the bigger work can commence.


P.S, anyone know where the +ve feed to the front fogs connects to the engine bay loom? I'm gueesing it terminates at one of the fuse box multi plugs. (Will check wiring schematics when I have time). I want to install them as part of my engien bay loom, as being a GLS they aren't fitted as standard, and the donor loom was vandalised by me before I remembered I wanted that section. lol


If my mate will be a 3rd hand tonight, I will get the 360 engine bay loom all soldered up, running where I want it to and functional once more.
STREETO WITHDRAWL
INTO BURNOUTSsince1982

User avatar
L14MNP
Posts: 1340
Joined: 26 May 2010 09:15 pm
Location: Sunderland/Durham

Re: Turbo 360 - wiring loom(s) modification

Post by L14MNP » 20 Nov 2010 11:04 am

I have finished all of the extention work except for the headlights/sidelights/side reps on both sides. This is because the copper in the wires is corroded and won't tin up.

What's the best for cleaning this up? I tried production paper, it improved a bit, but not enough. I should have took a pic, the wire's aren't completely ruined, just a little blackened.

My mate suggested trying Cillit Bang - which I am going to. We've all seen what it does to a penny! :lol:

Any other ideas?

Acquiring another loom won't really help, as the (newer) donor loom I have been taking lengths from also has the same issues.

Short of re-wiring these sections I can't think of anything else (if the CB fails) Google time.
STREETO WITHDRAWL
INTO BURNOUTSsince1982

User avatar
L14MNP
Posts: 1340
Joined: 26 May 2010 09:15 pm
Location: Sunderland/Durham

Re: Turbo 360 - cleaning up corroded wiring. Help? 20/11

Post by L14MNP » 20 Nov 2010 12:18 pm

Google seems to agree. There's a geezer done similar on a Renault forum. I'll give it a bash later on.
STREETO WITHDRAWL
INTO BURNOUTSsince1982

Post Reply