Door hinge pin renewal.
Posted: 13 Sep 2006 12:47 pm
Morning all,
First point door hinges on all cars wear to a greater or lesser degree. On 300 series cars it is a common problem - especially on 3 door cars due to the length and weight of the doors. Fortunately the door hingepins are "sacrificial" and are easy to replace.
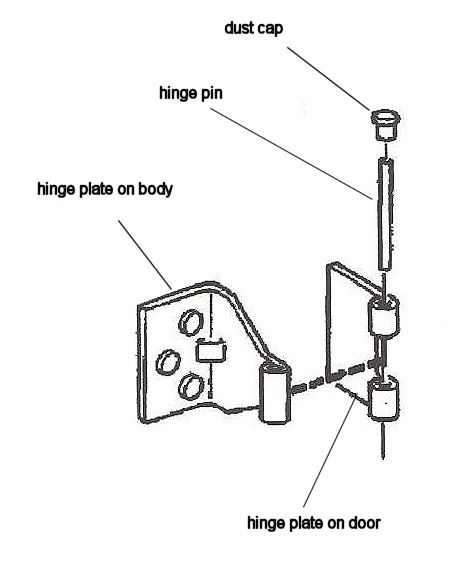
The hinge arrangement is quite conventional with a sprung steel hollow pin linking the articulating halves of the hinge. The hollow pin is packed with grease on assembly and is sealed with a plastic dust cap top and bottom.
Each door has two hinges and the pins are the same front and rear.
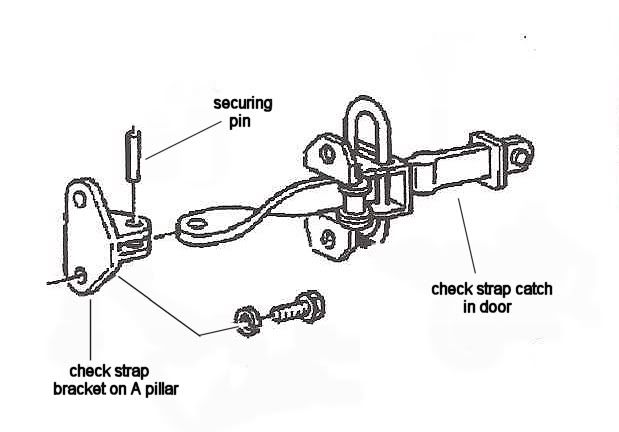
All doors are fitted with checks straps. The front comprising of a bracket on the A pillar and a sprung catch in front edge of the door. The two halves being linked by a roll pin at an articulating joint.
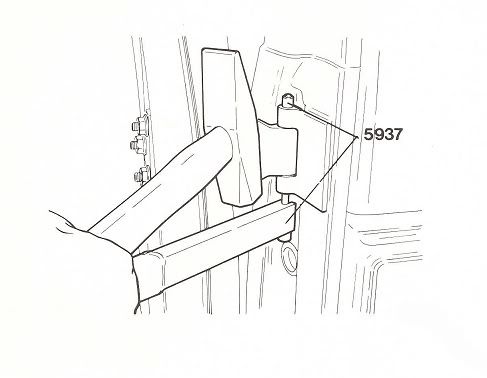
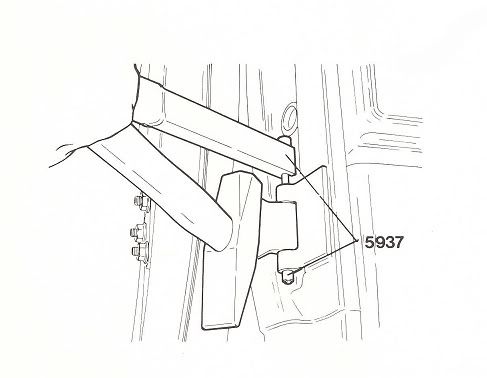
The rear door check strap is different, being a sprung unit in a single piece bolted to the door frame and to the b pillar.
Generally it is only the top pins which wear to any extent but even a slight degree of wear causes door drop and difficulty in closing without lifting the door.
I have changed pins solo but it is much, much, easier with two people.
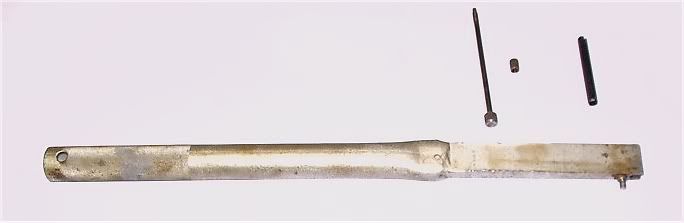
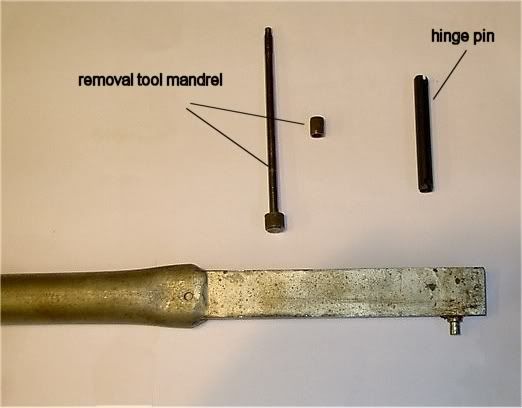
The hinge pins are simply driven into the hinges but due to the space available you cannot just use a drift - hence the need for a removal tool.
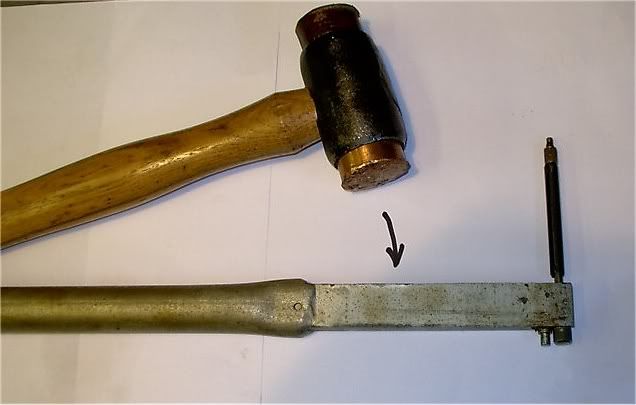
Basically the tool has a mandrel with a threaded fitting on top (slightly smaller in diameter then the hinge pin). The pin dust caps are removed and the mandrel passed through the pin and the threaded fitting screwed on. A forked forcing bar is engaged with the mandrel and struck with a hammer. The upper pin is removed downwards and the lower pin removed upwards. Each door is serviced in the same way.
Whilst it is theoretically possible to replace the hinge pins with the check straps fitted it is far more easy if they are disengaged first. In fact on the rear doors they must be released.
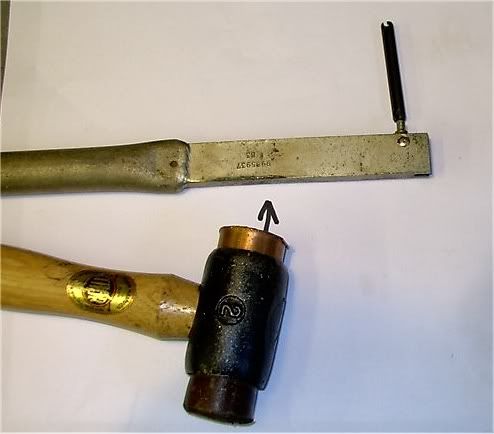
On the front doors the allen bolts securing the check straps are often VERY tight and it is simpler to drive out the articulating pin with a 5mm parallel punch. Having released the check strap open the door as far as possible without fouling the front wing and have your assistant/wife/neighbour support the door. Fit the tool and remove the upper pin. Pack the new hingepin with grease (I use copper grease) and install it. The new pin is inserted from below on the upper hinge and from above on the lower (opposite to removal). The tool forcing bar has a nipple on which the new pin can be engaged to hammer it in.
Removal.
Refitting.
Hinge pins are still available under part no.3140643 (2 needed per door)
Front check strap pins under part no.3282546 (1 per front door)
Hinge pin sealing caps under part no.3120620 (4 per door).
If present, the sealing caps and check strap pins can be re-used.
The job may seem daunting - but it really is far easier than it looks.
But you must have a pin removal tool - the pics are of my own Volvo tool but there are generic tools available that will do the job just as well as long as the mandrel will fit the Volvo pins.
Anything not clear - just ask.
Here endeth todays lesson! - Mac.
First point door hinges on all cars wear to a greater or lesser degree. On 300 series cars it is a common problem - especially on 3 door cars due to the length and weight of the doors. Fortunately the door hingepins are "sacrificial" and are easy to replace.
The hinge arrangement is quite conventional with a sprung steel hollow pin linking the articulating halves of the hinge. The hollow pin is packed with grease on assembly and is sealed with a plastic dust cap top and bottom.
Each door has two hinges and the pins are the same front and rear.
All doors are fitted with checks straps. The front comprising of a bracket on the A pillar and a sprung catch in front edge of the door. The two halves being linked by a roll pin at an articulating joint.
The rear door check strap is different, being a sprung unit in a single piece bolted to the door frame and to the b pillar.
Generally it is only the top pins which wear to any extent but even a slight degree of wear causes door drop and difficulty in closing without lifting the door.
I have changed pins solo but it is much, much, easier with two people.
The hinge pins are simply driven into the hinges but due to the space available you cannot just use a drift - hence the need for a removal tool.
Basically the tool has a mandrel with a threaded fitting on top (slightly smaller in diameter then the hinge pin). The pin dust caps are removed and the mandrel passed through the pin and the threaded fitting screwed on. A forked forcing bar is engaged with the mandrel and struck with a hammer. The upper pin is removed downwards and the lower pin removed upwards. Each door is serviced in the same way.
Whilst it is theoretically possible to replace the hinge pins with the check straps fitted it is far more easy if they are disengaged first. In fact on the rear doors they must be released.
On the front doors the allen bolts securing the check straps are often VERY tight and it is simpler to drive out the articulating pin with a 5mm parallel punch. Having released the check strap open the door as far as possible without fouling the front wing and have your assistant/wife/neighbour support the door. Fit the tool and remove the upper pin. Pack the new hingepin with grease (I use copper grease) and install it. The new pin is inserted from below on the upper hinge and from above on the lower (opposite to removal). The tool forcing bar has a nipple on which the new pin can be engaged to hammer it in.
Removal.
Refitting.
Hinge pins are still available under part no.3140643 (2 needed per door)
Front check strap pins under part no.3282546 (1 per front door)
Hinge pin sealing caps under part no.3120620 (4 per door).
If present, the sealing caps and check strap pins can be re-used.
The job may seem daunting - but it really is far easier than it looks.
But you must have a pin removal tool - the pics are of my own Volvo tool but there are generic tools available that will do the job just as well as long as the mandrel will fit the Volvo pins.
Anything not clear - just ask.
Here endeth todays lesson! - Mac.