360 carby fuel supply

B14, B172, B19/200, D16 engine, ignition, cooling, fuel & exhaust system, gearbox, variomatic, final drive... | Tuning: engine swaps, welded diff, clutch upgrades...
NO parts requests here, please use our V3M BUY & SELL corner
User avatar
bogbasic
Posts: 1861
Joined: 21 Nov 2004 10:12 pm
Location: New Malden, Surrey.
Contact:

Re: 360 carby fuel supply

Post by bogbasic » 19 Jun 2022 11:42 pm

A completely automotively mental weekend. The rear brakes on the P5 were reassembled and the blue 1.7 strut nut tightened, as was the handbrake cable. A bit more waxoyling done on the latter car, too.

Image
Image
Image
Image
Image
Image
Image
Image
Image
Image
1988 340 1.4 GL, 218k, 5 door (Grey Bess). Gone to CBA.
1991 340 1.7 GL, 64k, 5 door, petrol blue (Deep Blue).
1988 360 2.0 GLE, 140k, 5 door, ocean blue metallic (Blue Bess).
1989 340 1.7 GL, 108k, 3 door (Red Ness).
More info here!

User avatar
TasMan
Posts: 203
Joined: 04 Jun 2019 06:09 pm
Location: Ayr, SW Scotland

Re: 360 carby fuel supply

Post by TasMan » 25 Jun 2022 11:25 am

Hi Jon,
Not had a chance to be on of late, just checking in, looks like you have been busy on the fleet!
Keep up the good work. :D
I've not done many miles of late, too busy with other stuff going on.
My daily Skoda SUperb has needed 4 x new tyres and discs and pads all round so that has dented the wallet. I managed to get the fronts replaced under warranty as they were replaced 12 months and 8000 miles ago but ended up warped....? Running Michelin Crossclimates which are a great tyre, I got 30,000 miles out the last set and they were still around 3mm.
Cheers just now
Dave
1987 360 GLT

User avatar
bogbasic
Posts: 1861
Joined: 21 Nov 2004 10:12 pm
Location: New Malden, Surrey.
Contact:

Re: 360 carby fuel supply

Post by bogbasic » 26 Jun 2022 01:44 pm

Cool work.
1988 340 1.4 GL, 218k, 5 door (Grey Bess). Gone to CBA.
1991 340 1.7 GL, 64k, 5 door, petrol blue (Deep Blue).
1988 360 2.0 GLE, 140k, 5 door, ocean blue metallic (Blue Bess).
1989 340 1.7 GL, 108k, 3 door (Red Ness).
More info here!

User avatar
bogbasic
Posts: 1861
Joined: 21 Nov 2004 10:12 pm
Location: New Malden, Surrey.
Contact:

Re: 360 carby fuel supply

Post by bogbasic » 28 Jun 2022 12:38 am

The rover is back together and working fine. Slight problem is that when the garage broke the brake pipe last year and left the car on the street for weeks, I decided to put it back into storage to sort everything myself and I apparently broke the parking brake at that point. The car had no brakes so in the panic of trying to stop it crashing (on private land, officer) I accidentally-on-purpose whacked it into Park and heard a loud grinding sound. I read that when the parking brake breaks you get a bang, but this was definitely a grind, but I am still assuming that that it broke at that point, rather than when the garage mob were bellending about with it ? ? The web suggests the job can be done with the gearbox in situ and I have a donor gearbox, fortunately, from which a parking brake pawl will be removed, barring disasters. Just need to see if the car gets an MOT without a functional parking brake. Maybe I will see if the old pawl can be repaired. That'll be interesting to sort that one out ;-0 ;-0

I was hoping to pass this one on at some stage, but it never wants to go away.

sm97 sm97 sm97 sm97
1988 340 1.4 GL, 218k, 5 door (Grey Bess). Gone to CBA.
1991 340 1.7 GL, 64k, 5 door, petrol blue (Deep Blue).
1988 360 2.0 GLE, 140k, 5 door, ocean blue metallic (Blue Bess).
1989 340 1.7 GL, 108k, 3 door (Red Ness).
More info here!

User avatar
bogbasic
Posts: 1861
Joined: 21 Nov 2004 10:12 pm
Location: New Malden, Surrey.
Contact:

Re: 360 carby fuel supply

Post by bogbasic » 29 Jun 2022 12:50 am

Right, so here we go with more bulletins from the bleeding edge of bellendiana ;-0 ;-0

Have you got a problem, Jon? Yes, the thought of my broken parking pawl is giving me many issues, so today I started to take apart my donor Borg Warner 35 autobox which has been under tarpaulins for 20 years by the dustbins.

Image

But why aren't you posting this on the Rover P5 forum? Because they're a load of rude old bellends who are there just for trolling wimps like me. But I thought you liked baiting trolls, Jon? Yes, but only when I'm in a better mood ;-0 ;-0

OK, so the rusty old sump tray came off well enough and the innards look to be in really great condition. By using the spanner as a substitute for the selector arm, I was able to get all the gears and I could see the parking pawl engage with the main gear. Here I think the gearbox is in reverse which is one step away from park.

Image

You can see that the claw jobbie on the right of the picture below is lifted up and away from the pawl mechanism.

Image

In contrast, here is the selector in park:

Image

In this situaish, the claw device is engaged with the knob that pushes the pawl down onto the gear and locks it nicely.

Image

Right, so the next step is to see about removing the pawl which involves removing the back of the gearbox, I have read. For the gearbox on the car, this will mean disconnecting the prop shaft, for my sins.
1988 340 1.4 GL, 218k, 5 door (Grey Bess). Gone to CBA.
1991 340 1.7 GL, 64k, 5 door, petrol blue (Deep Blue).
1988 360 2.0 GLE, 140k, 5 door, ocean blue metallic (Blue Bess).
1989 340 1.7 GL, 108k, 3 door (Red Ness).
More info here!

User avatar
bogbasic
Posts: 1861
Joined: 21 Nov 2004 10:12 pm
Location: New Malden, Surrey.
Contact:

Re: 360 carby fuel supply

Post by bogbasic » 29 Jun 2022 10:33 pm

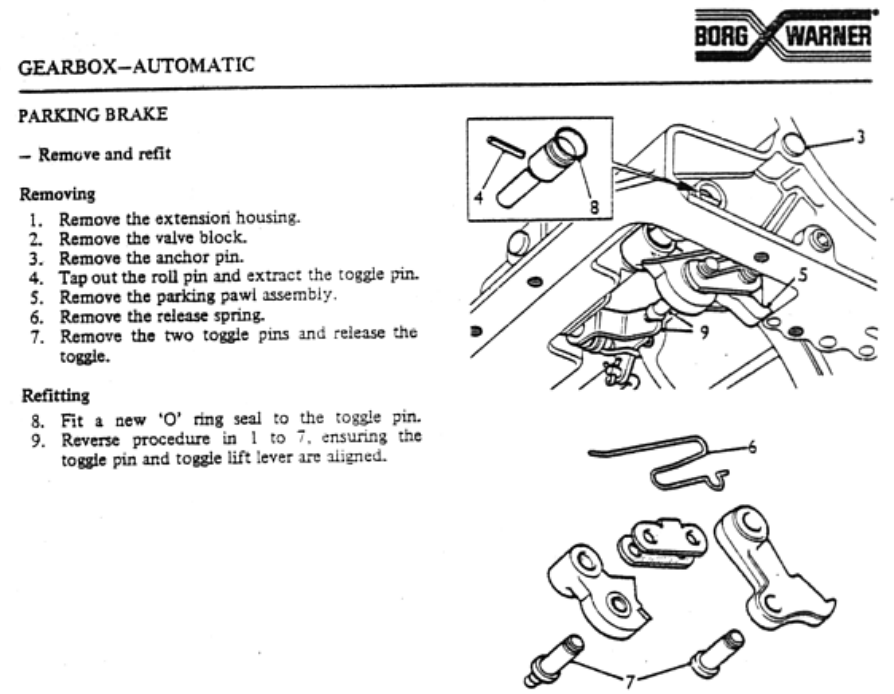
I need to type all of this in to keep a record of all the bellendian things I am doing and to help plan ahead. Anyway, here is a screenshot from the Borg Warner BW35 manual which shows what's involved. Note, that I don't agree with point number 2 but everything else in the picture summarises the state of today's progress, except that I simply could not remove the anchor pin, item 3.

Image

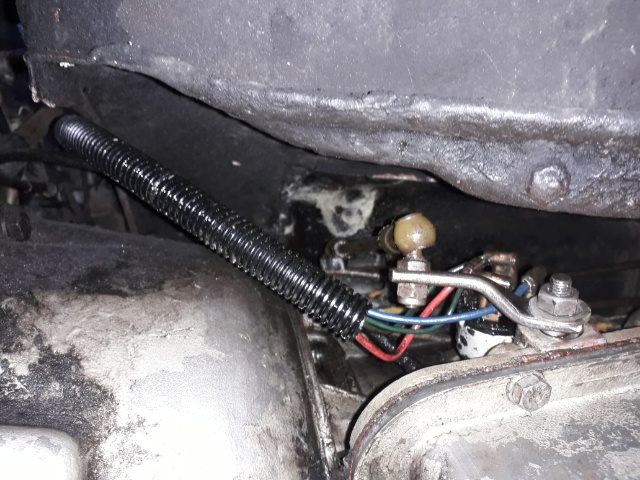
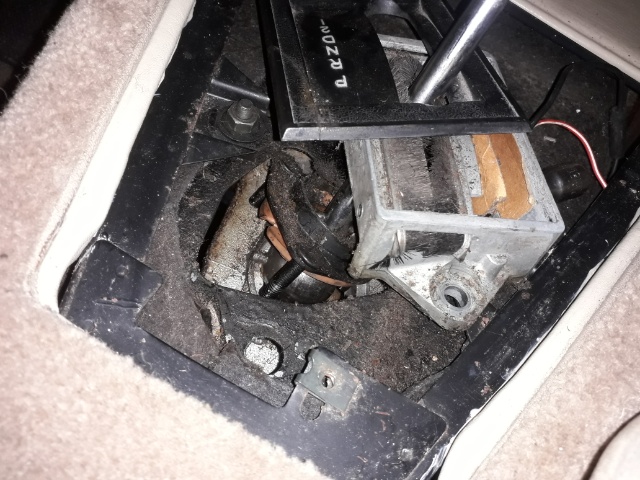
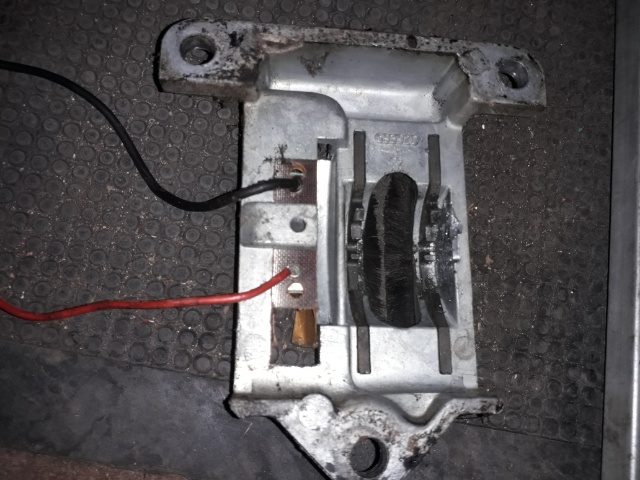
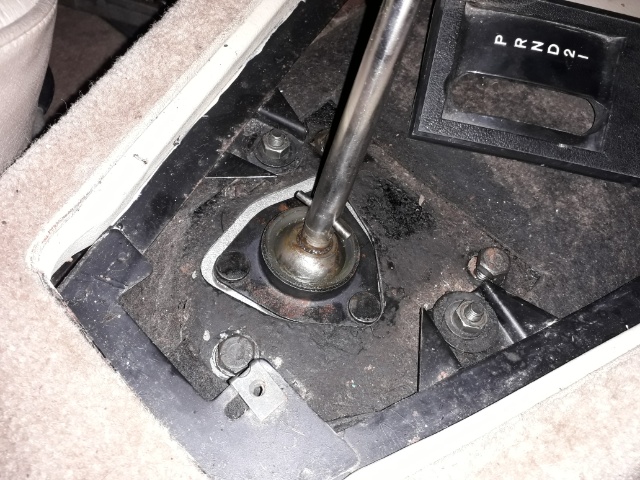
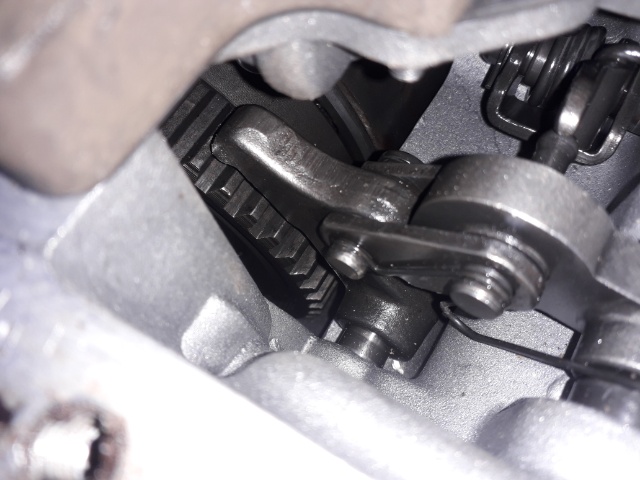
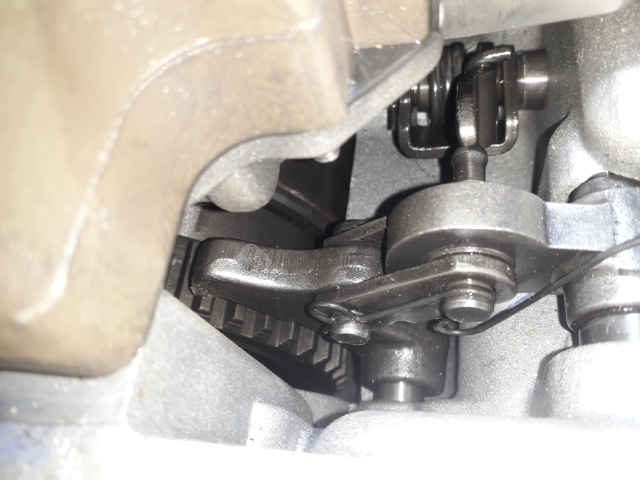
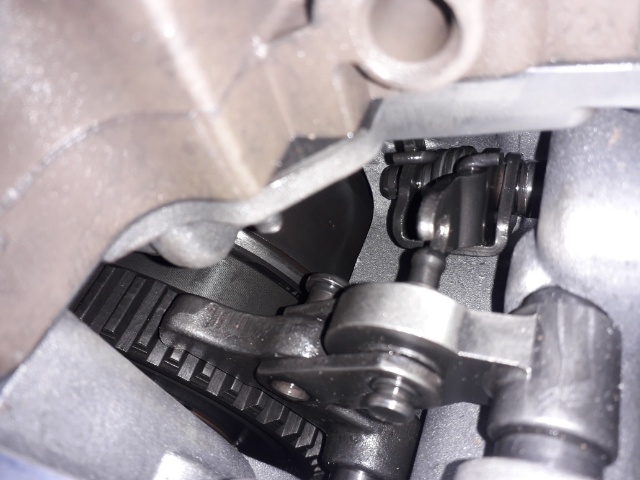
Before I move on to today's lesson, here is another view which shows the parking pawl better than previous pictures.

Image

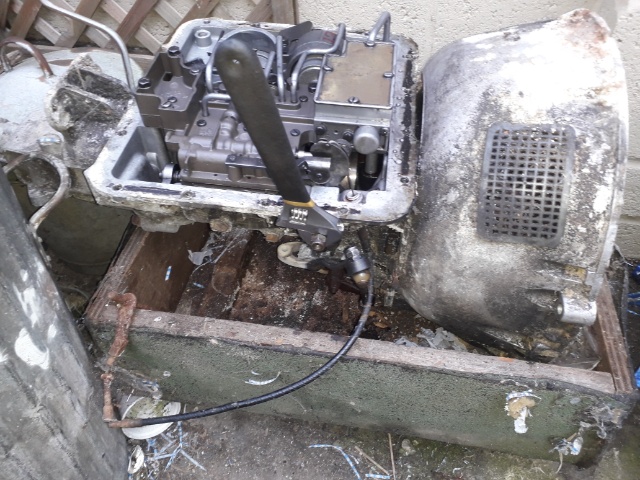
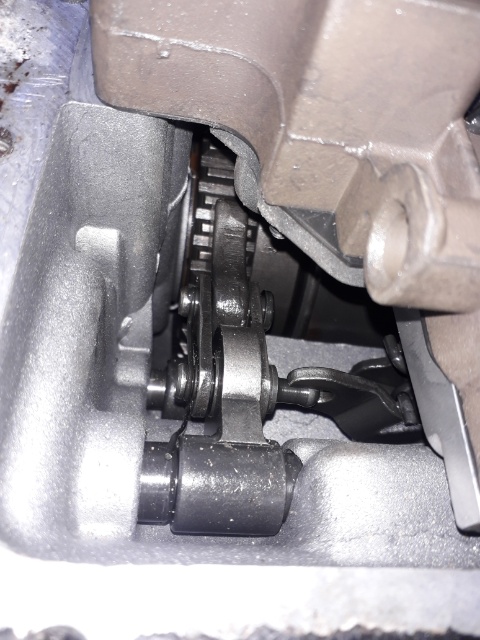
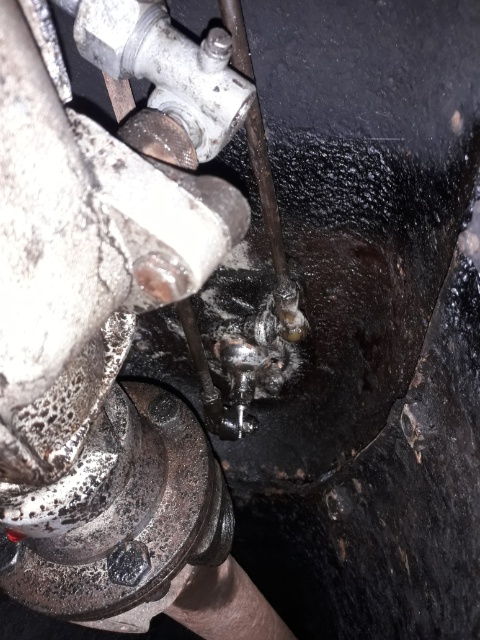
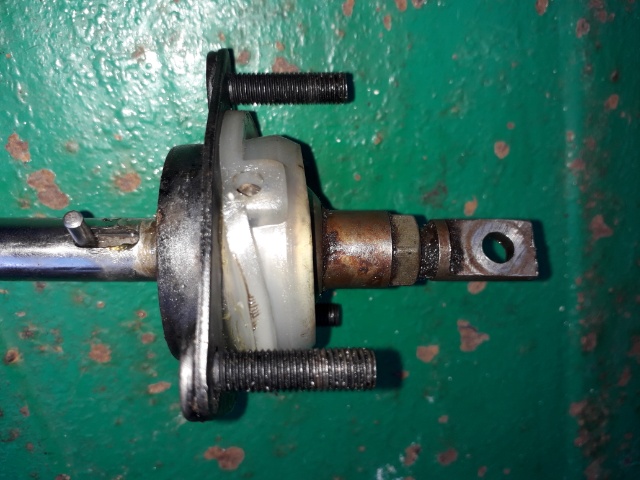
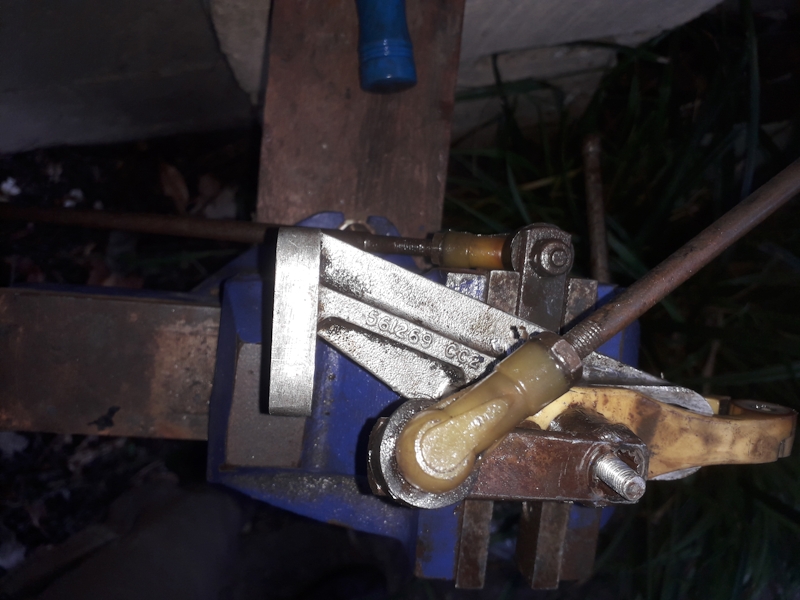
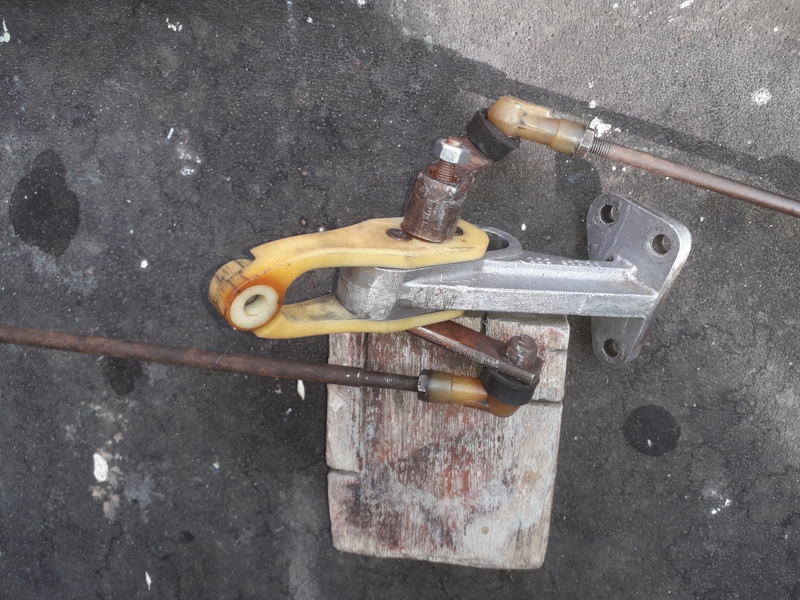
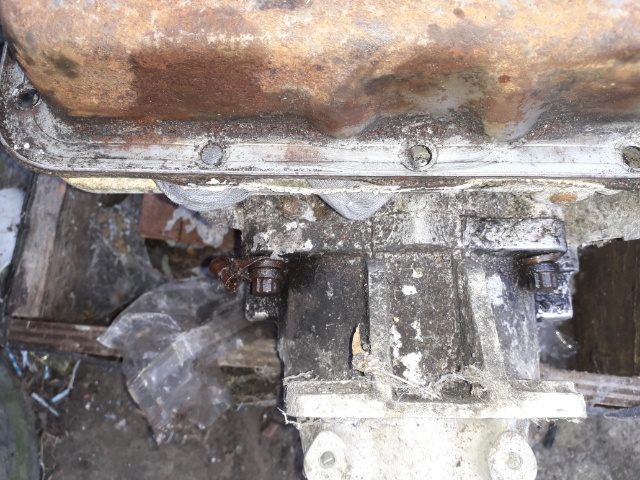
So the first thing was to remove the rear extension part of the gearbox, well, I managed to unbolt it and turn it round so that I had access to the anchor pin (3) about which the pawl pivots.

Image

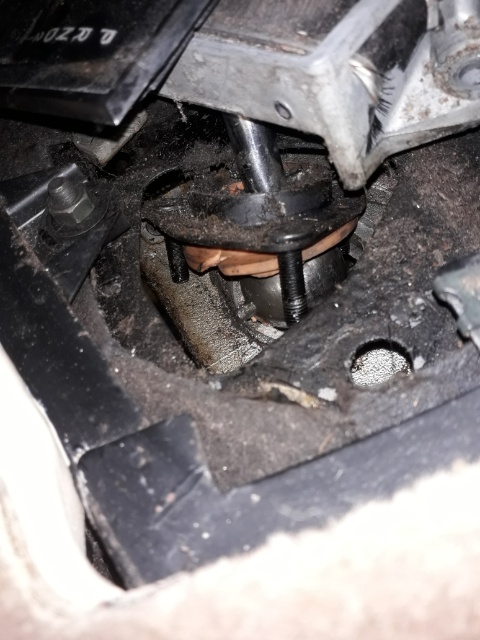
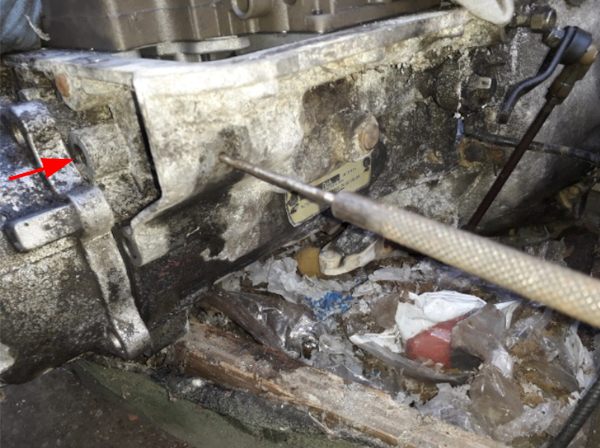
The red arrow shows the anchor pin and the parallel pin punch shown was used to tap out the roll pin (4) which holds the toggle pin (8) in place.

Image

Image

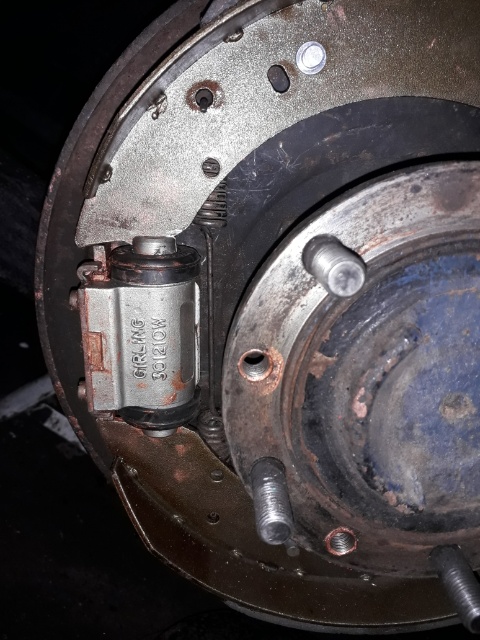
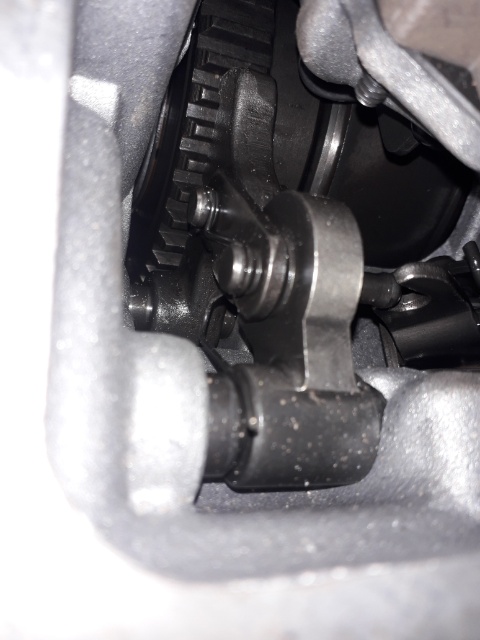
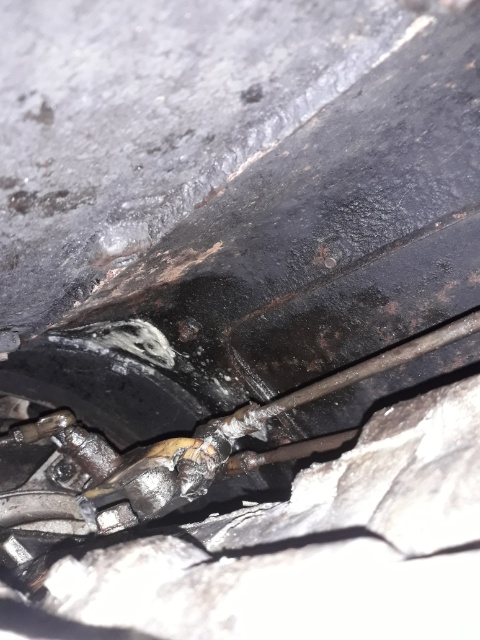
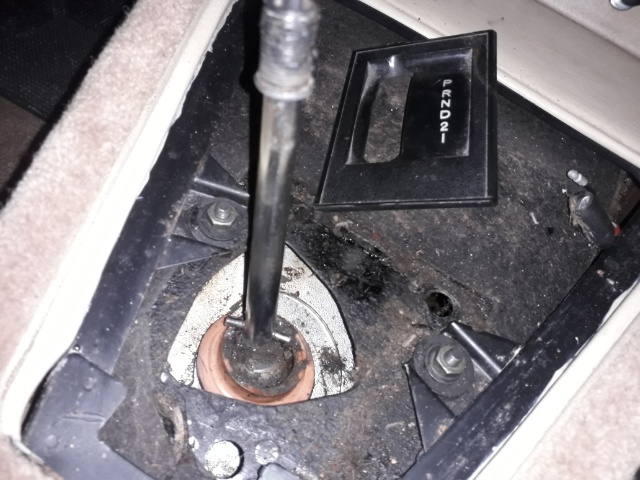
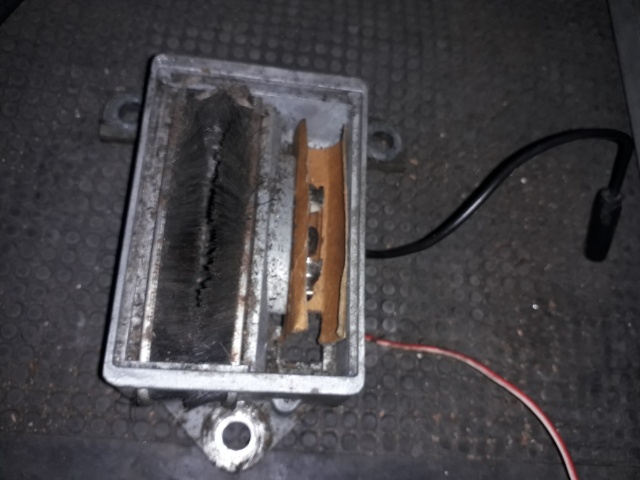
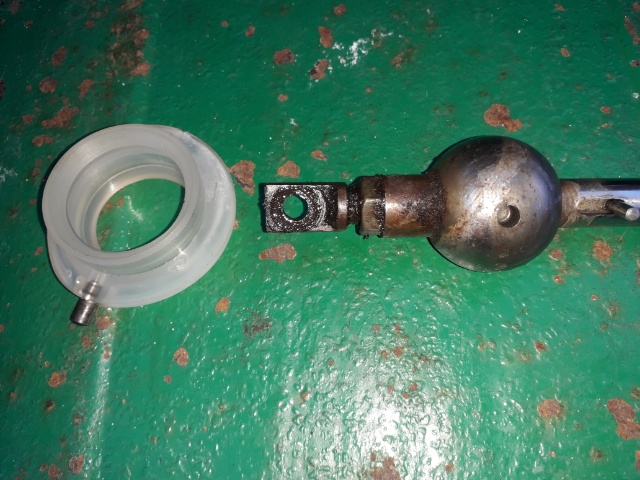
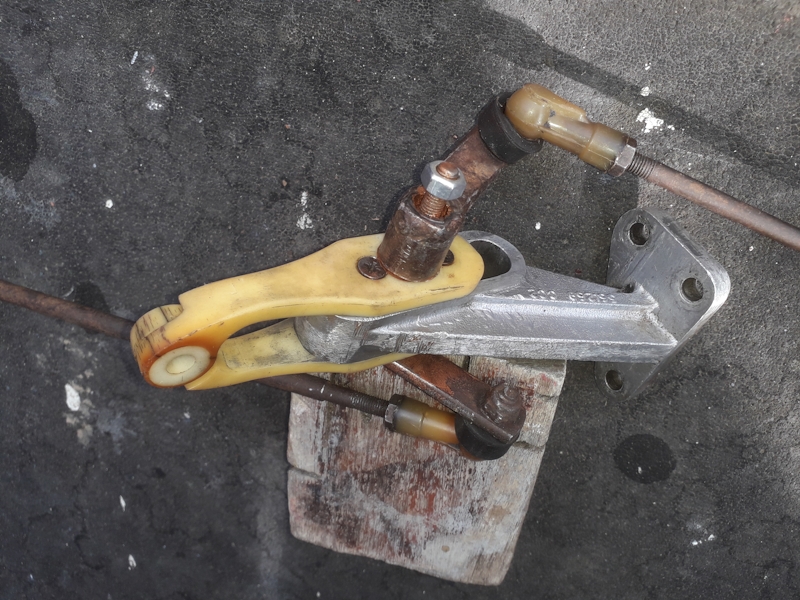
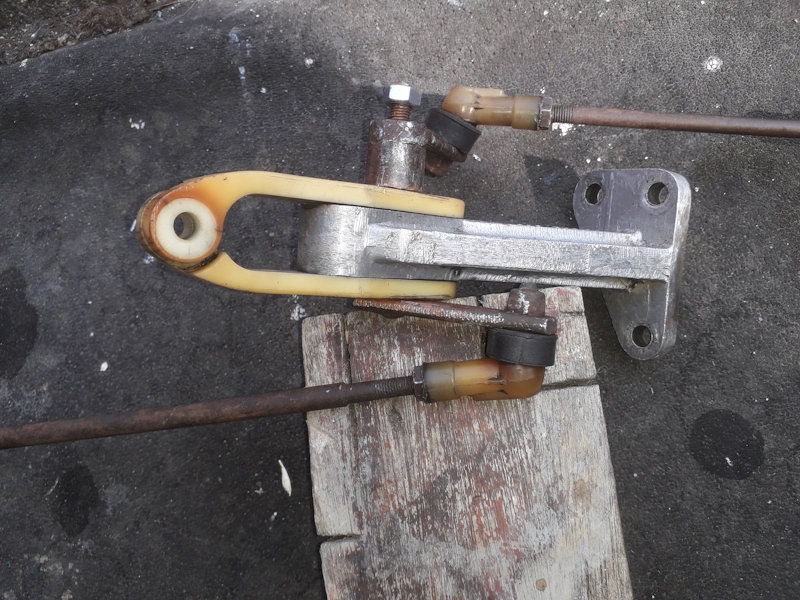
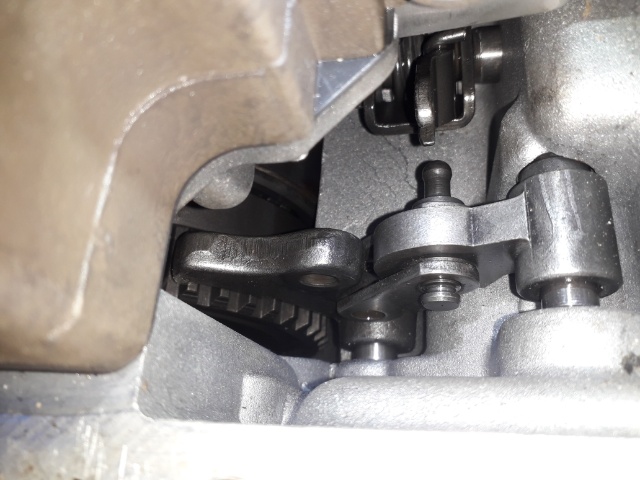
So far so good. The next thing is to remove the dodgy-looking spring clip which is shown below in a partially removed state.

Image

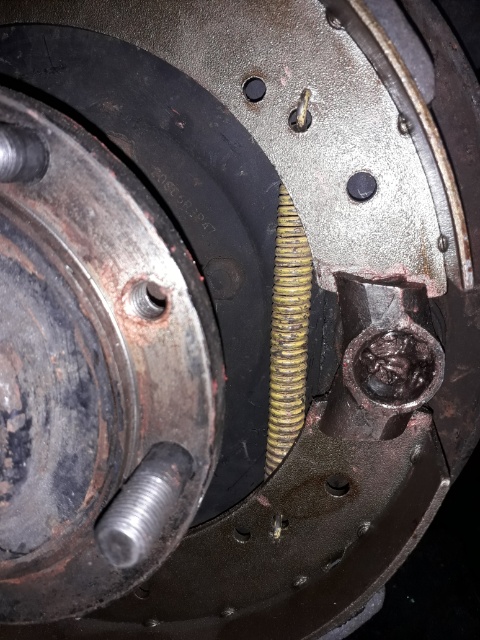
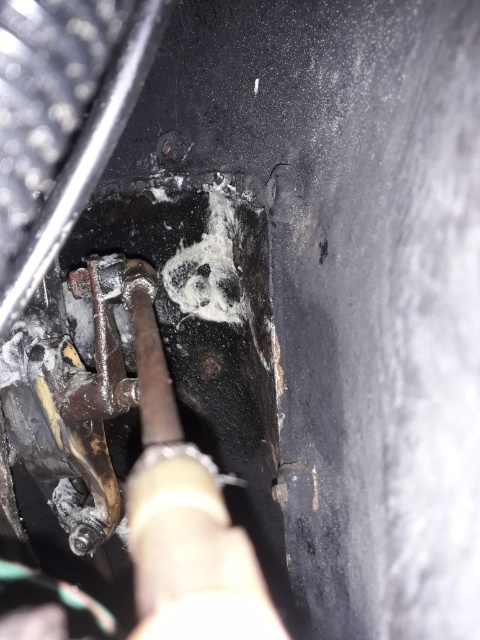
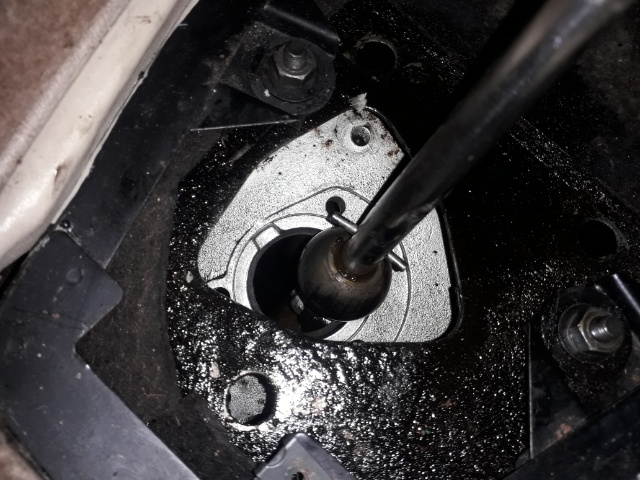
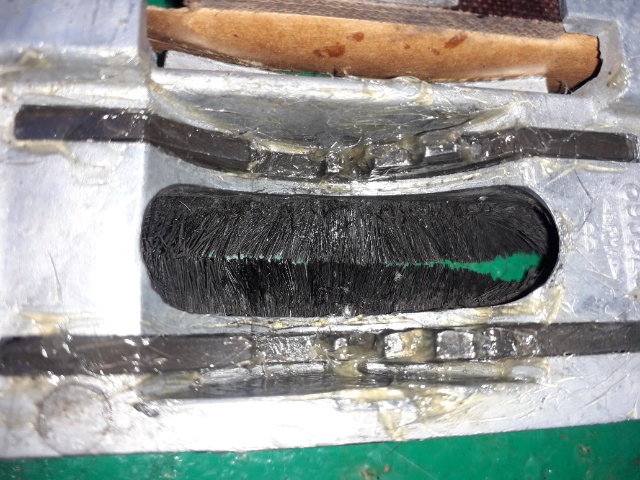
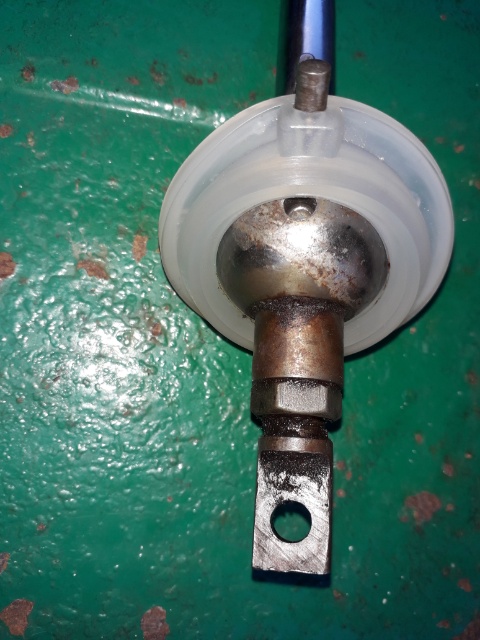
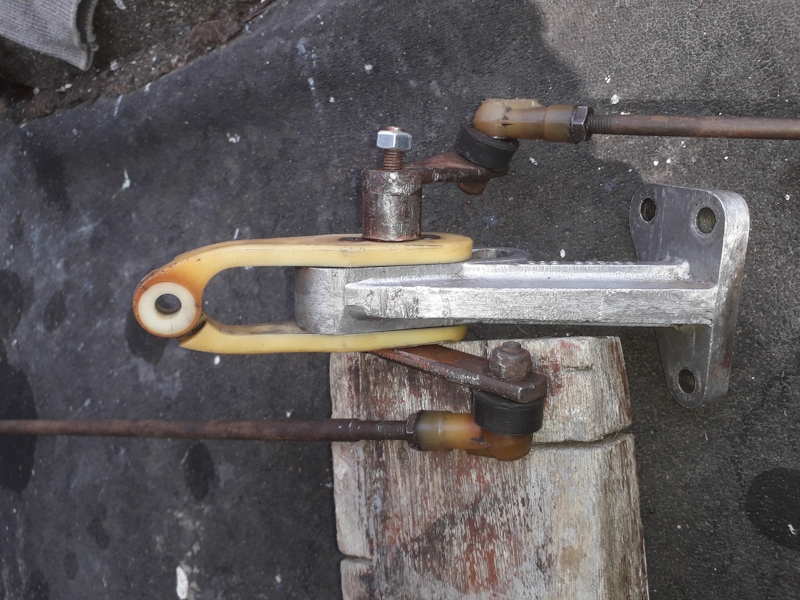
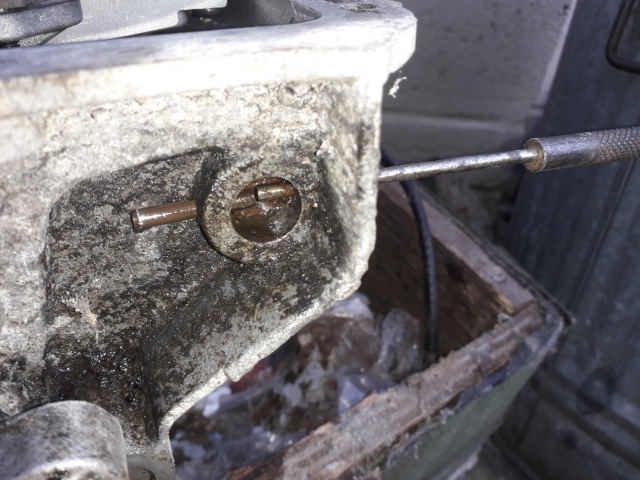
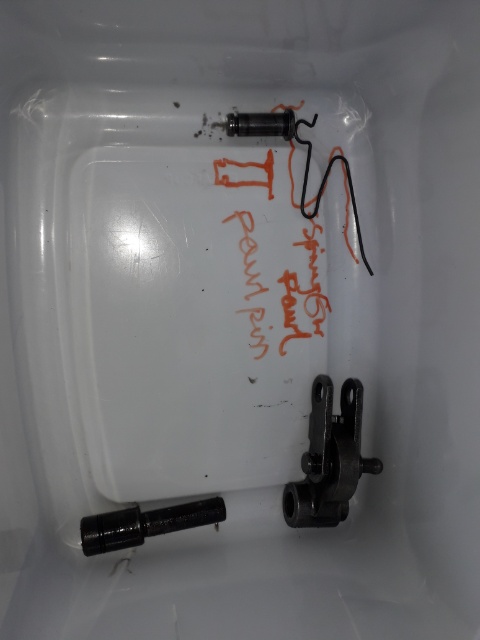
And, this shows one of the two smaller toggle pins within the pawl mechanism in a partially removed state, too. The picture below that one shows the same toggle pin fully removed.

Image

Image

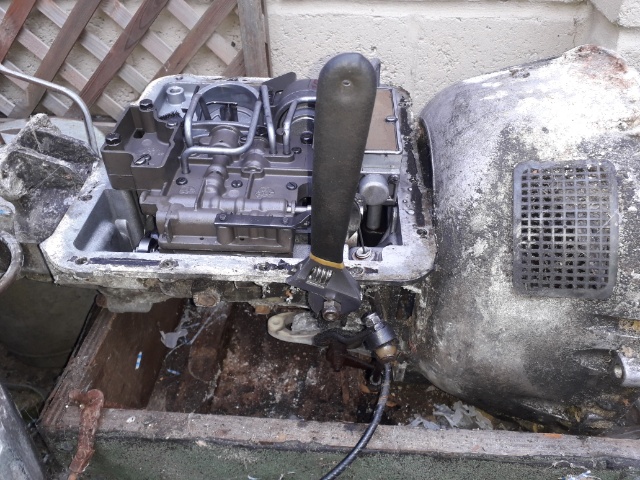
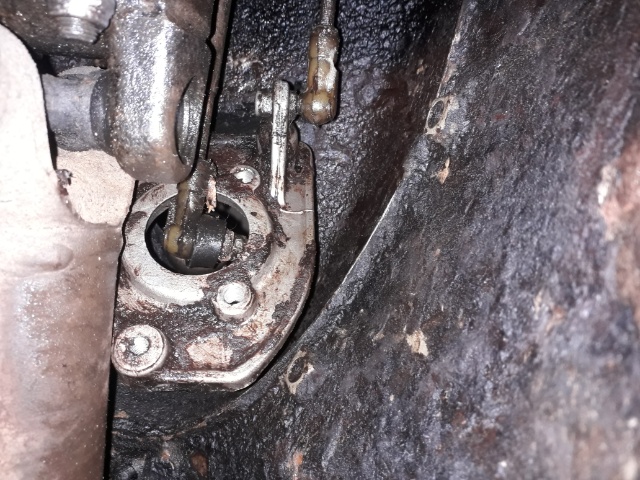
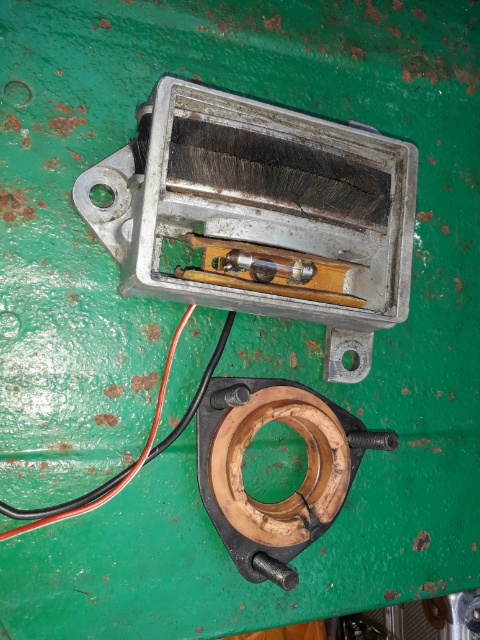
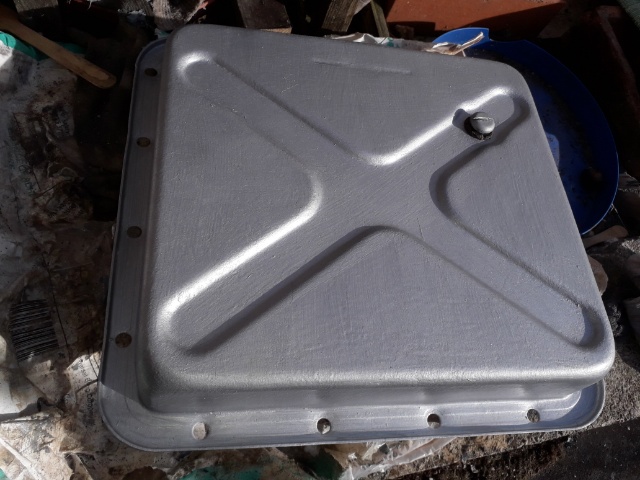
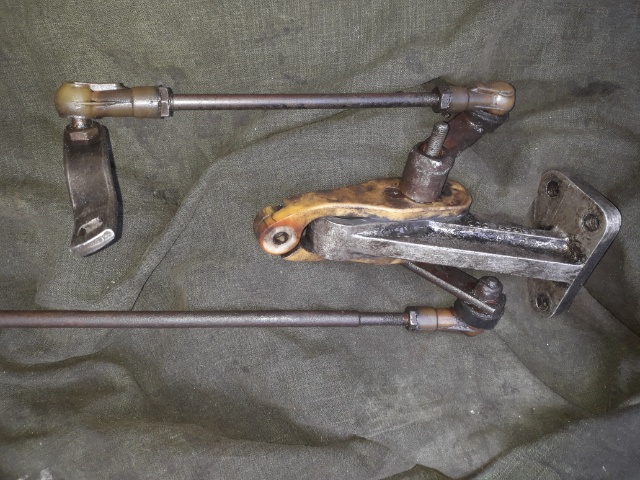
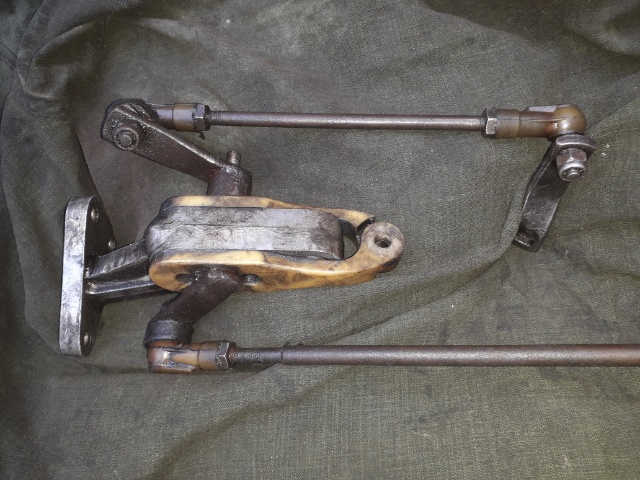
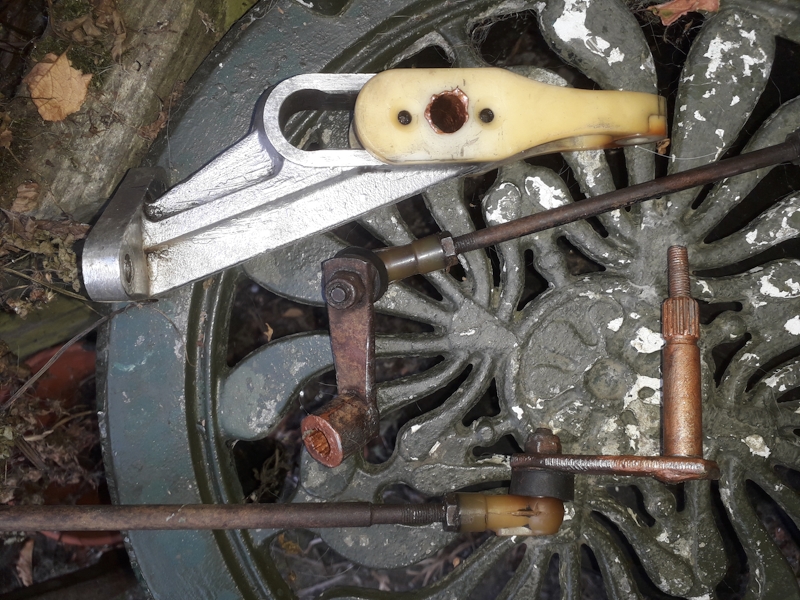
One last picture shows everything off the donor gearbox, but, and a very big but, I was not able, as mentioned above, to remove the anchor pin for the pawl itself and so decided that the next thing to do is to take a look inside the gearbox on the car to see exactly what has gone wrong. Possibly the pawl isn't broken and the mechanism might have simply become disengaged somehow so that it ratchets rather than working properly or maybe something else has broken rather than the pawl itself.

Image

Time will tell, but if the garage haven't started the MOT tomorrow I think I will cancel it to concentrate on getting the car back on blocks to have a look inside the gearbox rather than attempt anything potentially destructive with the donor box, which I was assured by the seller in 2003 was a perfectly good gearbox, so lets try to keep it that way, although the rats that have been nesting in and around it will obviously have to relocate if it ever gets used for anything!! A couple of phone calls to specialist firms today confirmed that parts for the BW35 are second hand only, so I am feeling very lucky to have this box just when its needed. The older swedish ovlovovs used this box too, so I don't feel quite so guilty using up all the club resources for my innumerable issues.
1988 340 1.4 GL, 218k, 5 door (Grey Bess). Gone to CBA.
1991 340 1.7 GL, 64k, 5 door, petrol blue (Deep Blue).
1988 360 2.0 GLE, 140k, 5 door, ocean blue metallic (Blue Bess).
1989 340 1.7 GL, 108k, 3 door (Red Ness).
More info here!

User avatar
bogbasic
Posts: 1861
Joined: 21 Nov 2004 10:12 pm
Location: New Malden, Surrey.
Contact:

Re: 360 carby fuel supply

Post by bogbasic » 30 Jun 2022 11:27 pm

No progress today. Sick as a dog ;-0 ;-0

sm84 sm84
1988 340 1.4 GL, 218k, 5 door (Grey Bess). Gone to CBA.
1991 340 1.7 GL, 64k, 5 door, petrol blue (Deep Blue).
1988 360 2.0 GLE, 140k, 5 door, ocean blue metallic (Blue Bess).
1989 340 1.7 GL, 108k, 3 door (Red Ness).
More info here!

User avatar
bogbasic
Posts: 1861
Joined: 21 Nov 2004 10:12 pm
Location: New Malden, Surrey.
Contact:

Re: 360 carby fuel supply

Post by bogbasic » 02 Jul 2022 12:06 am

Better today and got the P5 up on stands and blocks for a bash at the gearbox. I think, as someone on the P5 forum told me, its going to be an adjustment to the selector mechanism because if I disconnect it from the box and turn the selector knob with a spanner, as shown above, I can get park OK and it locks up the rear wheel perfectly well. Not 100% sure its OK because it feels a bit rubbish engaging Park so I think I might drop the gearbox sump and have a look to check. Why on earth do that? That has got to be the most bellendian thing that you could possibly do! True, but then I will be abso sure that the pawl mechanism isn't damaged and I can save and filter the old ATF oil to put in my donor box to keep it happy for another 20 years. I must also put it back together carefully, paint the sump pan and find a better way of storing the heavy whole thing.
1988 340 1.4 GL, 218k, 5 door (Grey Bess). Gone to CBA.
1991 340 1.7 GL, 64k, 5 door, petrol blue (Deep Blue).
1988 360 2.0 GLE, 140k, 5 door, ocean blue metallic (Blue Bess).
1989 340 1.7 GL, 108k, 3 door (Red Ness).
More info here!

User avatar
bogbasic
Posts: 1861
Joined: 21 Nov 2004 10:12 pm
Location: New Malden, Surrey.
Contact:

Re: 360 carby fuel supply

Post by bogbasic » 03 Jul 2022 11:06 pm

Some pictures showing some things I did today. Probably the only concrete piece of progress was replacing the connector on the blue wire to the inhibitor switch, as shown.

Image

The above picture shows a plastic ball-joint thing on the gear selector mechanism and yesterday a good deal of time was spent adjusting it to the correct length and finding that this made the park gear function a lot worse. As can be seen in the picture below, there are two other connection rods with placky ball joints which connect to the base of the gear lever. The manual gives lengths for these two rods which are incorrect but I found the correct values on the P5 forum and checked these are OK - they are. Some time was spent tightening up one or two of the ball joint lock nuts. Yes, they are lock nuts but the garage obviously decided not to bother doing all of them back up again, by a large margin. Never mind.

Image

The picture below this text shows the top of the short vertical connection rod, the bottom of which is close to the inhibitor switch. The top of this short rod is seen on the left. On the right, the two longer rods connect with a slidey device (compensator) which does appear to be sliding as it should i.e. its not seized-up which I was thinking would be case. I was expecting that freeing this off would be the next job, but no so lets just grease everything up for the moment - that's what all that white sprayed-on stuff is.

Image

The picture below shows the same slidey thing viewed from the bottom of the short selector rod. Again, tons of grease overspray - sloppy work.

Image

Anyway, sloppy or not, one advantage of greasing everything generously is that, when I was testing the compensator again, I could hear something knocking up and down. Complete mystery to start with but eventually I noticed that the big ball joint on the bottom of the gear lever was bouncing up and down about 1 cm. My current theory is that there is too much slack in the gear selector mechanism because of this and hence I am unable to reliably get the park gear.

Hence, the next plan is to look at the base of the gear lever from inside the car which will require a bit more cleanliness, so that will have to be another day when I am not covered in black grease from head to toe.
1988 340 1.4 GL, 218k, 5 door (Grey Bess). Gone to CBA.
1991 340 1.7 GL, 64k, 5 door, petrol blue (Deep Blue).
1988 360 2.0 GLE, 140k, 5 door, ocean blue metallic (Blue Bess).
1989 340 1.7 GL, 108k, 3 door (Red Ness).
More info here!

User avatar
bogbasic
Posts: 1861
Joined: 21 Nov 2004 10:12 pm
Location: New Malden, Surrey.
Contact:

Re: 360 carby fuel supply

Post by bogbasic » 04 Jul 2022 11:46 pm

OK, so fair bit of progress today dismantling the base of the gear lever. As it happens, part of this had to be done under the car. First thing then, we undo them bolts, them bolts...

Image
Image
Image

And, underground, overground, everything starts to come apart as it should, thankfully. What can be seen is a very knackered gear lever bush. Anyway the great clean-up of everything in sight starts.

Image
Image

Other bits removed for a clean-up and the detents for the gear lever pin were greased a bit, too.

Image
Image

What is interesting is that the pin is slightly bent and was significantly off-centre. I guess the latter is responsible for the severe grazing to one side of the ali casting which houses the pin's detents (shown above). Anyway, I tapped it back in so its more central.

Image
Image

Anyway, the grease is quite good at covering these defects from view so hopefully everything will be better when its back together. Shame is that my current account is so broke, I can't order a new bush *sob*. Yet more delays afoot, no doubt.

sm75 sm75 sm75 sm75
1988 340 1.4 GL, 218k, 5 door (Grey Bess). Gone to CBA.
1991 340 1.7 GL, 64k, 5 door, petrol blue (Deep Blue).
1988 360 2.0 GLE, 140k, 5 door, ocean blue metallic (Blue Bess).
1989 340 1.7 GL, 108k, 3 door (Red Ness).
More info here!

User avatar
bogbasic
Posts: 1861
Joined: 21 Nov 2004 10:12 pm
Location: New Malden, Surrey.
Contact:

Re: 360 carby fuel supply

Post by bogbasic » 06 Jul 2022 11:36 pm

Right, so finally sorted out my current account and have ordered a new bush for the gear lever and a couple of gearbox sump gaskets. Meanwhile, the fairly seriously rusty sump from the donor gearbox has been semi-derusted with a few coats of Naval Jelly and rubs-down in between, as well as a few rubs with Brillo pads. It's not good enough for a visible panel, but it'll do for an out-of-sight sump which will be dripping with oil and mud, so we'll prime it with Kurust and turn it from grey to black. Ignore the big blade of grass in the way.

Image
Image

The Kurust dries quickly enough this time of year so we'll whip on a coat of Humbrol enamel (yes, art shop paint again) which will turn it back to a nice grey again. I can't say that grey raises my testosterone level to astronomical heights, but it does look quite nice in the right place ;-0 ;-0 Anyway, for the preverts among us, that colour is Humbrol 156 enamel dark camouflage grey satin.

Image
Image

The inside of the sump is a bit rusty on one side which I am a bit worried about so when the paint is dry I will put some Naval Jelly on that for a few rubs-down and maybe it will be OK for use after that. I might use this newly painted one on the car if I decide to check the park pawl mechanism after all. Maybe I will, maybe I won't. It'll depend on whether the new gear lever bush completely cures the park problem.
1988 340 1.4 GL, 218k, 5 door (Grey Bess). Gone to CBA.
1991 340 1.7 GL, 64k, 5 door, petrol blue (Deep Blue).
1988 360 2.0 GLE, 140k, 5 door, ocean blue metallic (Blue Bess).
1989 340 1.7 GL, 108k, 3 door (Red Ness).
More info here!

User avatar
bogbasic
Posts: 1861
Joined: 21 Nov 2004 10:12 pm
Location: New Malden, Surrey.
Contact:

Re: 360 carby fuel supply

Post by bogbasic » 10 Jul 2022 12:56 am

Oh, I did love that Humbrol enamel grey colour, but t'was not to last because the gloss was a bit patchy so I decided to spray it with some laquer. As they say, I tested an area that wouldn't show too much and it was OK, so therefore sprayed the rest of it and disaster strikes yet again. My beloved Humbrol all wrinkled up so it had to be scraped off and replaced with silver Hammerite which I eventually found a tin of. Had I found it earlier on I wouldn't have used the Humbrol stuff, but still it was worth a try as it opens up some interesting cheappie painting options, maybe.

Image

Back to working on the car, the new bush arrived and when I tried to fit it to the gear lever ball, I noticed that the retaining pin was missing and that the lever has to be removed to fit the bush to it. Consequently some time was spent finding the pin which had fallen out under the car and removing the gear lever which wasn't too bad.

Image
Image
Image

A bit of a clean-up all round and copious use of my favorite substance, plumber's grease, allowed everything to start going back together and back onto the car, even. A parallel pin punch (another of my faves) was used to tap the pin back in. The pictures don't show the aluminium casting at the base of the gear lever being refitted, but it was definitely done!

Image
Image

So it went back together quicker than I expected but the gear change is stiffer than it was before and the park gear still does not work. This is pretty typical of that car, so doing lots of work (well, some anyway) and finding that it makes the situation worse is all fine and tickety-boo by me. Lets not be deterred - there is the lower selector rod which still isn't at the correct length so that will be sorted first and then I may disconnect the base of the lever again to make sure that the compensator is not seized-up since my efforts to check it before were a bit shaky.
1988 340 1.4 GL, 218k, 5 door (Grey Bess). Gone to CBA.
1991 340 1.7 GL, 64k, 5 door, petrol blue (Deep Blue).
1988 360 2.0 GLE, 140k, 5 door, ocean blue metallic (Blue Bess).
1989 340 1.7 GL, 108k, 3 door (Red Ness).
More info here!

User avatar
bogbasic
Posts: 1861
Joined: 21 Nov 2004 10:12 pm
Location: New Malden, Surrey.
Contact:

Re: 360 carby fuel supply

Post by bogbasic » 12 Jul 2022 01:29 am

Eventually decided that the source of the now incredible stiffness of the gear lever is the pivot through the sliding plastic part of the compensator. The sliding part slides very easily but the pivot going through it is well proper hard. I tried to dismantle it in situ for some lubrication but this task was impossible and in the end it was easier to unbolt the whole thing.

Image
Image

Lordy, the heat doesn't help. It looks like part of a giant locust and a bit scary, too.
1988 340 1.4 GL, 218k, 5 door (Grey Bess). Gone to CBA.
1991 340 1.7 GL, 64k, 5 door, petrol blue (Deep Blue).
1988 360 2.0 GLE, 140k, 5 door, ocean blue metallic (Blue Bess).
1989 340 1.7 GL, 108k, 3 door (Red Ness).
More info here!

User avatar
bogbasic
Posts: 1861
Joined: 21 Nov 2004 10:12 pm
Location: New Malden, Surrey.
Contact:

Re: 360 carby fuel supply

Post by bogbasic » 17 Jul 2022 11:43 pm

After a fair few attempts at dismantling the compensator, I eventually procured a £5 chisel set from Poundland (everything one pound, not) and the results are, at long last, good, i.e. it finally came apart without damage to the plastic after several evenings of no success at all.

Image

This allowed it all to be cleaned up with a brillo pad and the teeth of the pivot and its socket were needle-filed slightly to de-rust them. The part of the pivot passing through the plastic parts was given a heavier file-down and a rub over with emery paper.

Image

A generous dose of copper ease and it all goes back together nicely and the pivot is very smooth. I'll leave it to dry overnight and then regrease the ball-joints and the sliding part of the compensator so it can go back on the car but the heat might set that back for a day or two, or three.

Image
Image
Image
Image
1988 340 1.4 GL, 218k, 5 door (Grey Bess). Gone to CBA.
1991 340 1.7 GL, 64k, 5 door, petrol blue (Deep Blue).
1988 360 2.0 GLE, 140k, 5 door, ocean blue metallic (Blue Bess).
1989 340 1.7 GL, 108k, 3 door (Red Ness).
More info here!

360beast
Posts: 873
Joined: 27 Dec 2013 08:40 pm

Re: 360 carby fuel supply

Post by 360beast » 20 Jul 2022 08:07 pm

Great work as always, I would recommend every few months lubricate the mechanism with ATF, it works wonders in removing rust. I put it on my side cutters and pliers on the pivot every now and then then work them back and forth and watch the rust come out!

Post Reply