Page 15 of 27

Re: Turbo 360 - underside resto

Posted: 07 Feb 2011 07:24 pm
by Hell Driver
Looks like you've been busy :D . Your enthusiasm for modification is clearly making it worth saving the car from rust and although no longer original, it will be saved and appreciated (which is much better then just being used till it's rusted beyond repair and scrapped). Some of those rust areas can get really bad if left. Shocked at how rusty the components are, as the car from above looked mint. Keep up the good work.

I'll be doing a lot of that work when I strip the 360 spares car to put on the the Mk 1 (and have to sort out the rust on the MK1)

Are later 360 fuel tanks plastic then? When I do the Mk 1 I'll have no where to put the spare wheel as it has the rear tank, unless I put the 360 tank on. Looks like spare wheel in the boot!

Re: Turbo 360 - underside resto

Posted: 07 Feb 2011 08:41 pm
by Nimminz
Looking good mate!!

Re: Turbo 360 - underside resto

Posted: 07 Feb 2011 10:05 pm
by volvodspec
Hell Driver wrote:Are later 360 fuel tanks plastic then? When I do the Mk 1 I'll have no where to put the spare wheel as it has the rear tank, unless I put the 360 tank on. Looks like spare wheel in the boot!
all redblock-300's had the steel saddle tank, 340 diesel got a plastic equivalant of the saddle tank.
343's spare wheel should be under the bonnet? like later 340's had it, but with a black painted bracket

Re: Turbo 360 - underside resto

Posted: 07 Feb 2011 11:04 pm
by SteveP
Bloody good effort mate! Looks like you're doing all the work at the right time when it's all kinda surface deep. Props to you, not nice working under them like that!

Re: Turbo 360 - underside resto

Posted: 07 Feb 2011 11:31 pm
by Hell Driver
volvodspec wrote:
Hell Driver wrote:Are later 360 fuel tanks plastic then? When I do the Mk 1 I'll have no where to put the spare wheel as it has the rear tank, unless I put the 360 tank on. Looks like spare wheel in the boot!
all redblock-300's had the steel saddle tank, 340 diesel got a plastic equivalant of the saddle tank.
343's spare wheel should be under the bonnet? like later 340's had it, but with a black painted bracket
I thought they might be mostly metal tanks, I'm hoping to make some alterations under the bonnet that don't leave room for the spare wheel :wink:

Re: Turbo 360 - underside resto

Posted: 07 Feb 2011 11:53 pm
by volvosneverdie
Hell Driver wrote: I thought they might be mostly metal tanks, I'm hoping to make some alterations under the bonnet that don't leave room for the spare wheel :wink:
This is news with a cool bent. 8)

Re: Turbo 360 - underside resto

Posted: 08 Feb 2011 11:30 pm
by L14MNP
volvosneverdie wrote:Duuuude.
Someones been busy!

Lookig awesome. 8)
Yeah, plodding along dude. Like I say, it has mostly been left standing until the last couple of weeks. Ron and John (sound like brothers lol) have been on hand to help with dismantling. I would have been stuck a few times otherwise. Cheers kids!

volvodspec wrote:very good work! and as you said, about 90% of all the mk2's are in a worse state when you get the car to this state
are you going to protect the cooler under there? would be a shame if loose gravell destroys it when it's tossed up by the rear wheels

Thanks Anjo. I am really pleased with the condition of this shell. I guess it sitting unused in a garage has done me a huge favour! Yeah, the cooler will have mesh covering it to stop stones etc kicking up as you say - hopefully lol.

Speedy88 wrote:Good work, will it be ready for the summer car shows? Would love to see it in the flesh.
Cheers dude! Yeah it will be sorted for summer. I want to get to some drift days, and for once having a semi-decent car will make me entusiastic about attending shows. lol It would be good to meet some of you lot too.
Hell Driver wrote:Looks like you've been busy :D . Your enthusiasm for modification is clearly making it worth saving the car from rust and although no longer original, it will be saved and appreciated (which is much better then just being used till it's rusted beyond repair and scrapped). Some of those rust areas can get really bad if left. Shocked at how rusty the components are, as the car from above looked mint. Keep up the good work.
I'll be doing a lot of that work when I strip the 360 spares car to put on the the Mk 1 (and have to sort out the rust on the MK1)

Are later 360 fuel tanks plastic then? When I do the Mk 1 I'll have no where to put the spare wheel as it has the rear tank, unless I put the 360 tank on. Looks like spare wheel in the boot!
Thanks matey! Yeah, I'm no purist, but I do like whatever car (project) I have at the time to be the best I can make it. I guess the tank strap. filler neck etc are in a worse state as they were powdercoated and it has just flaked off. Overall I am very happy with the condition of the shell and parts though!
As Anjo says, the tanks are all steel (I never knew about the derv item though).. I meant I will be swapping the crusty filler neck for a plastic mk3 item (Cheers FJ!)
I'm sure you will have as much fun as me(!) when you get to this stage on your mk1 mate. If anything deserves a new lease of life it is one of those with a manual box and a fruity engine! That was your plan for that one right?
Nimminz wrote:Looking good mate!!
Cheers Matt!
SteveP wrote:Bloody good effort mate! Looks like you're doing all the work at the right time when it's all kinda surface deep. Props to you, not nice working under them like that!

Thanks Steve. Yeah, just before it has a chance to esculate into anything other than surface is when I have struck. As you say, seems the right time.


Got in 3 hours on this tonight. I can think of better things to do when lying on your back lol. Actually, the car isn't very high off the ground atm so I was mostly on my side. Meh. 3 hours is all my old-ass arthritic hands can handle. As you know, this is a sh!tty job. It's morale boosting to see it change to shiny steel - in most cases - then red oxide primer though. :D I managed to get most of one side of the floorpans done.


Image
Image
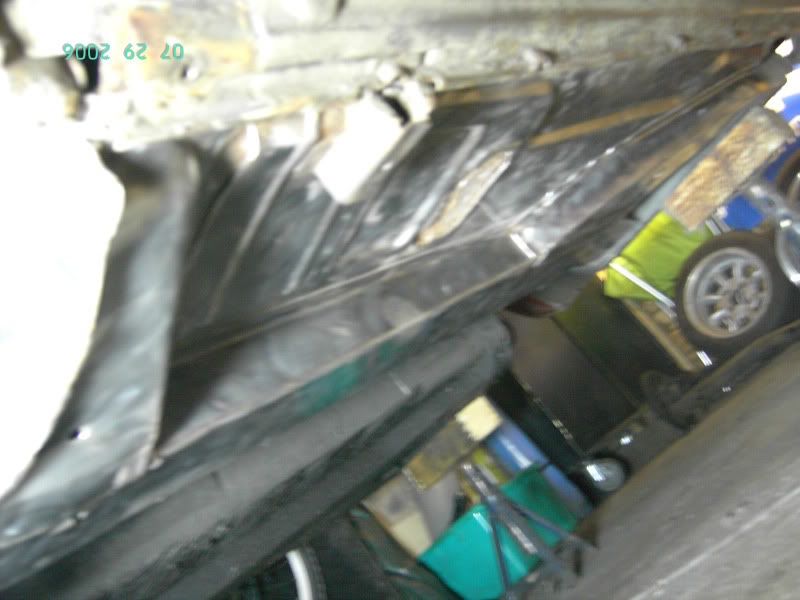
Underseal on the floor/on my chest. Clean steel FTW.

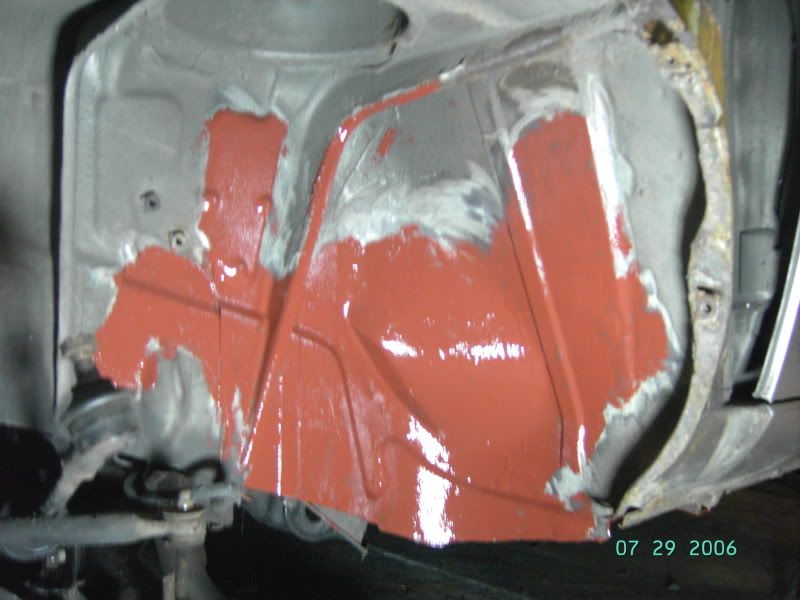
The only areas of 'concern' Now look like this:
Image
Image

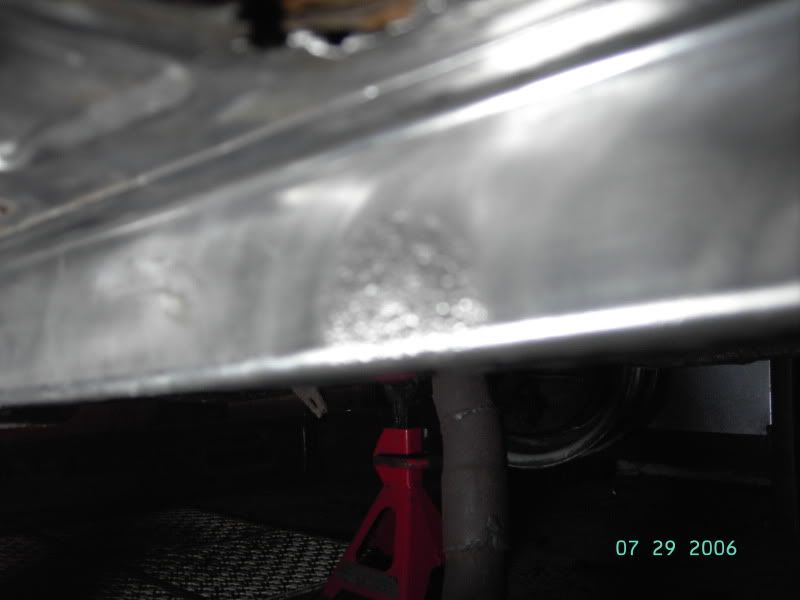
No doubt they wanted to grow up and become structural holes. Sorry guys! The kind of thing above is my reason for taking it back to bare metal. You think some areas are fine, but the steel is nearly always corroded beneath it. Those were showing as blisters through the underseal anyway, but you know what I mean lol.

Image
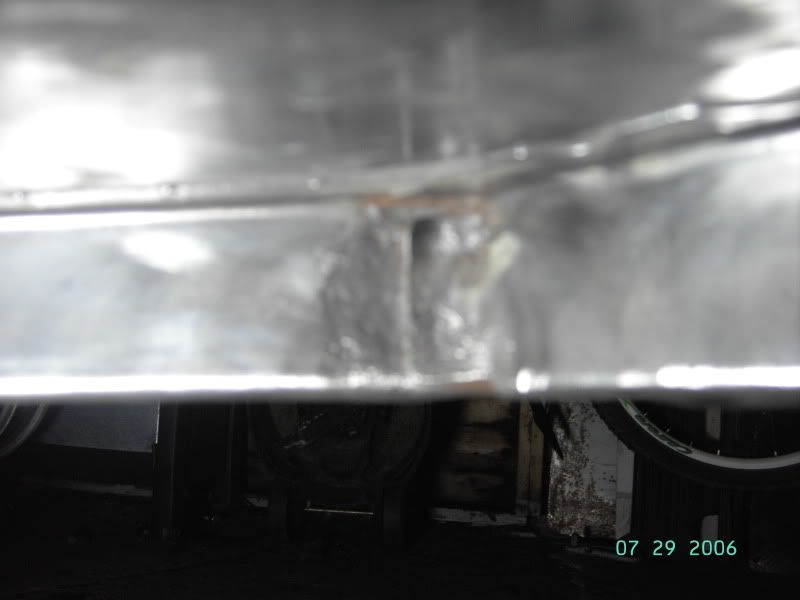
Jacking points like to rust away on these cars. I'm fine thankfully. I knew they were good anyway as I often jack the car from them.
Image
Image

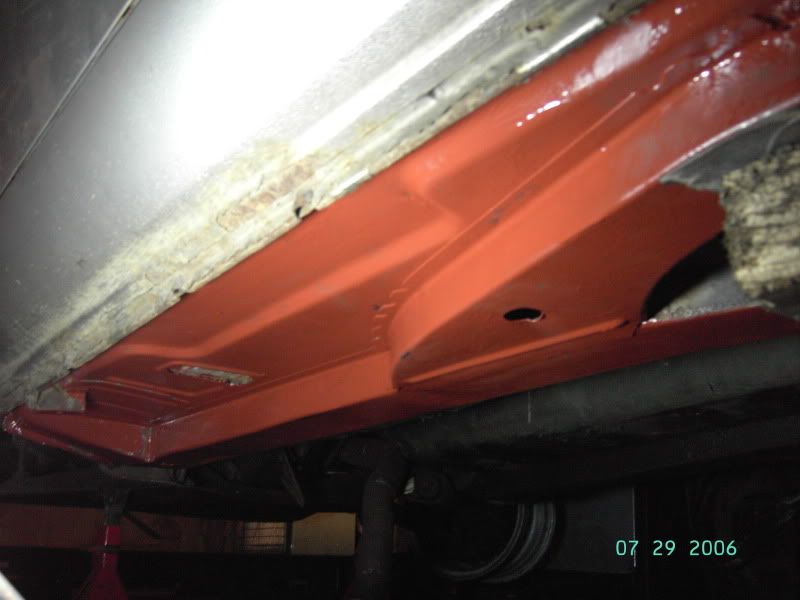
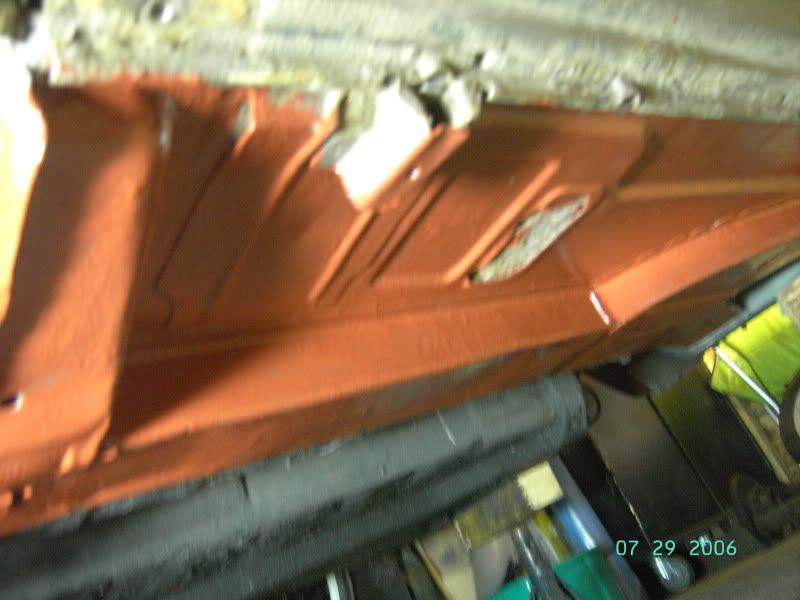
Marine spec red 'lead' FTW.


Anyone happen to have a pair of mk1/early mk2 front doors for sale? I want some. A pair of mk2 wings would be good too, oh and a mk2 GLT rear screen surround. lol
Did anyone visit that guy with the job lot of parts?


Thanks for looking, Liam.

Re: Turbo 360 - underside resto

Posted: 08 Feb 2011 11:39 pm
by Nimminz
Good work, wish i had somewhere i could do that, your sills are in better nick than mine :(

Keep us posted!

Re: Turbo 360 - underside resto

Posted: 09 Feb 2011 12:13 am
by L14MNP
I didn't have anywhere to do it until i tidied up and threw loads of shit away. :lol:

if you're wary of your sills I would get the wire brush on them then hammerite them black or rattle can them body coloured for now, just to save them worsening mate.

I'm rubbing mine all back when I get to it. 340pw

Re: Turbo 360 - underside resto

Posted: 09 Feb 2011 12:23 am
by Nimminz
aye, next sunny dry day i'm not at college i will do. looks like its been done before. driving all through the winter has done it no favours

Re: Turbo 360 - underside resto

Posted: 09 Feb 2011 12:30 am
by L14MNP
Aye. Two winters I put mine through, with no a great deal of jet washing in one. :lol:

It's never going back out in that crap again.

Re: Turbo 360 - underside resto

Posted: 10 Feb 2011 01:41 am
by Ride_on
Well done, thats alot of work, I know how hard it is. You been doing pretty much the same as me now, although mine was in a much worse state. Just getting to undersealing the rear now, bloody stuff is pulling apart at seams. Hopefully then I can reassemble the rear and move the car back in the garage to work at the front. THEEEN mot, THEEEN spray, THEEEN B230FT. Summer oye!

Re: Turbo 360 - underside resto

Posted: 11 Feb 2011 05:20 pm
by Fuse
Very good results for mechanical cleaning! May I ask what did you use? Wire brush disc on an angle grinder or what? I'll have some similiar stuff to do on some sections on the floor and the compressor isn't large enough for sandblasting so I'll have to do with mechanical cleaning for now.

Re: Turbo 360 - underside resto

Posted: 11 Feb 2011 05:45 pm
by trabitom99
Looks superb, I wish my cars had an underside anywhere near as clean as yours ... Well done for putting in all that work!

Tom

Re: Turbo 360 - underside resto

Posted: 12 Feb 2011 12:53 am
by Ride_on
Fuse wrote:Very good results for mechanical cleaning! May I ask what did you use? Wire brush disc on an angle grinder or what? I'll have some similiar stuff to do on some sections on the floor and the compressor isn't large enough for sandblasting so I'll have to do with mechanical cleaning for now.

Sandblasting ain't much good for undeseal anyway, maybe just the very thin stuff above the tank in a 360. Underseal needs to be mostly peeled + scraped with a heat gun at near burning point. The thick bits will come away very nicely in one piece but the thinner stuff has to be scraped with a thinish wood chisel. Wire brush I find is the best overall, and wire brush on angle grinder very good (but removes skin very quickly and the finger guard don't work), but only works on easy access areas.

Anyway about sandblasting, its more about storage, no mains compressor will ever supply real time air at 10cfm @ 100psi, but if you use a really small compressor it will die quickly. I used a 3.4cfm compressor to sandblast with, it worked fine until it died, even though it was rated for continuous operation (not oil free bollocks), it was about 20 years old! Now I have a 10cfm (consumption)/150psi compressor with about 100l storage. Air flow restriction is also important, and most small regulators will give you 70psi after setting them to 100psi, when you put 10cfm/100psi through them, you also goto watch union+quick fit restrictions. The standard PCL connectors will drop about 5-10psi at 10cfm, euro ones are much better.